

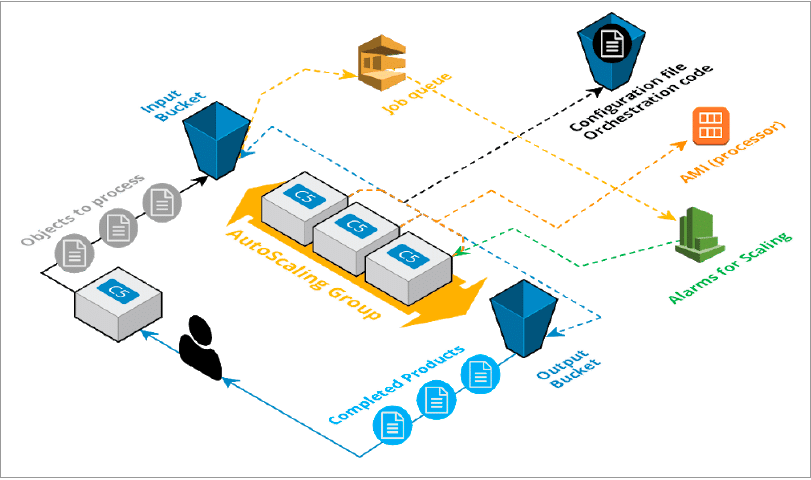
This diagram visualizes the CloudFormation template and shows how the different components relate to one another.
Background
This data recipe demonstrates the use of the ASF CloudFormation Template to automate the processing of Sentinel-1 RTC products in Amazon Web Services (AWS).
The goal is to process a downloaded Sentinel-1 GRDH product to a radiometrically terrain-corrected (RTC) product.
What is the CloudFormation Template?
The ASF CloudFormation Template automates the processing of Sentinel-1 RTC products.
The CloudFormation template itself is a set of instructions for AWS components to know when and how to talk to one another. For example, the template creates and connects a variety of AWS components, like a queue for managing work, and EC2 instances that do the actual work (RTC in this case).
The workflow goes like this:
- New files (objects to process) that need RTC are put into the S3 Input Bucket, which is like a folder or directory, but in the cloud and used for storage.
- When files land in the bucket, a job queue is notified to keep track of each bit of work. Each file gets its own message in the queue.
- When work is waiting in the queue, an alarm will trigger the AutoScaling group to create EC2 machines (C5 blocks in the diagram that are created based on a public AMI provided by ASF) to do the work.
- One EC2 machine will process one file waiting in the queue, creating an RTC product from the file in the input bucket.
- As RTC products are created, they are stored in the S3 Output Bucket, where you can then download them.
Required Pre-Steps
The How to Automatically Generate a Radiometrically Terrain-Corrected (RTC) Sentinel-1 Image using Cloud Computing data recipe requires an AWS account and launching an EC2 Instance.
Complete the How to Create a Basic Elastic Cloud Compute (EC2) Instance before proceeding with this data recipe.
Prerequisites
Materials List:
- The s1_rtc_cloudformation_OpenSource__east_v0.txt file
- Go to Vertex and download a Sentinel-1 GRDH product, or download this sample image: S1B_IW_GRDH_1SDV_20180417T161803_20180417T161817_010525_01330D_7E38
Note: This recipe will work with Sentinel-1 GRDH data except for data located above 60° latitude. You can also process more than one GRDH product at a time.
Estimated Cost:
- Processing one file costs approximately $0.12 and takes about 20-30 minutes.
Steps for Applying RTC
Creating the CloudFormation Stack
This first setup deploys the Sentinel-1 RTC CloudFormation Stack. A stack is a collection of AWS resources that you can manage as a single unit. When you are done creating the stack, you will be ready to apply RTC to the Sentinel-1 GRDH image.
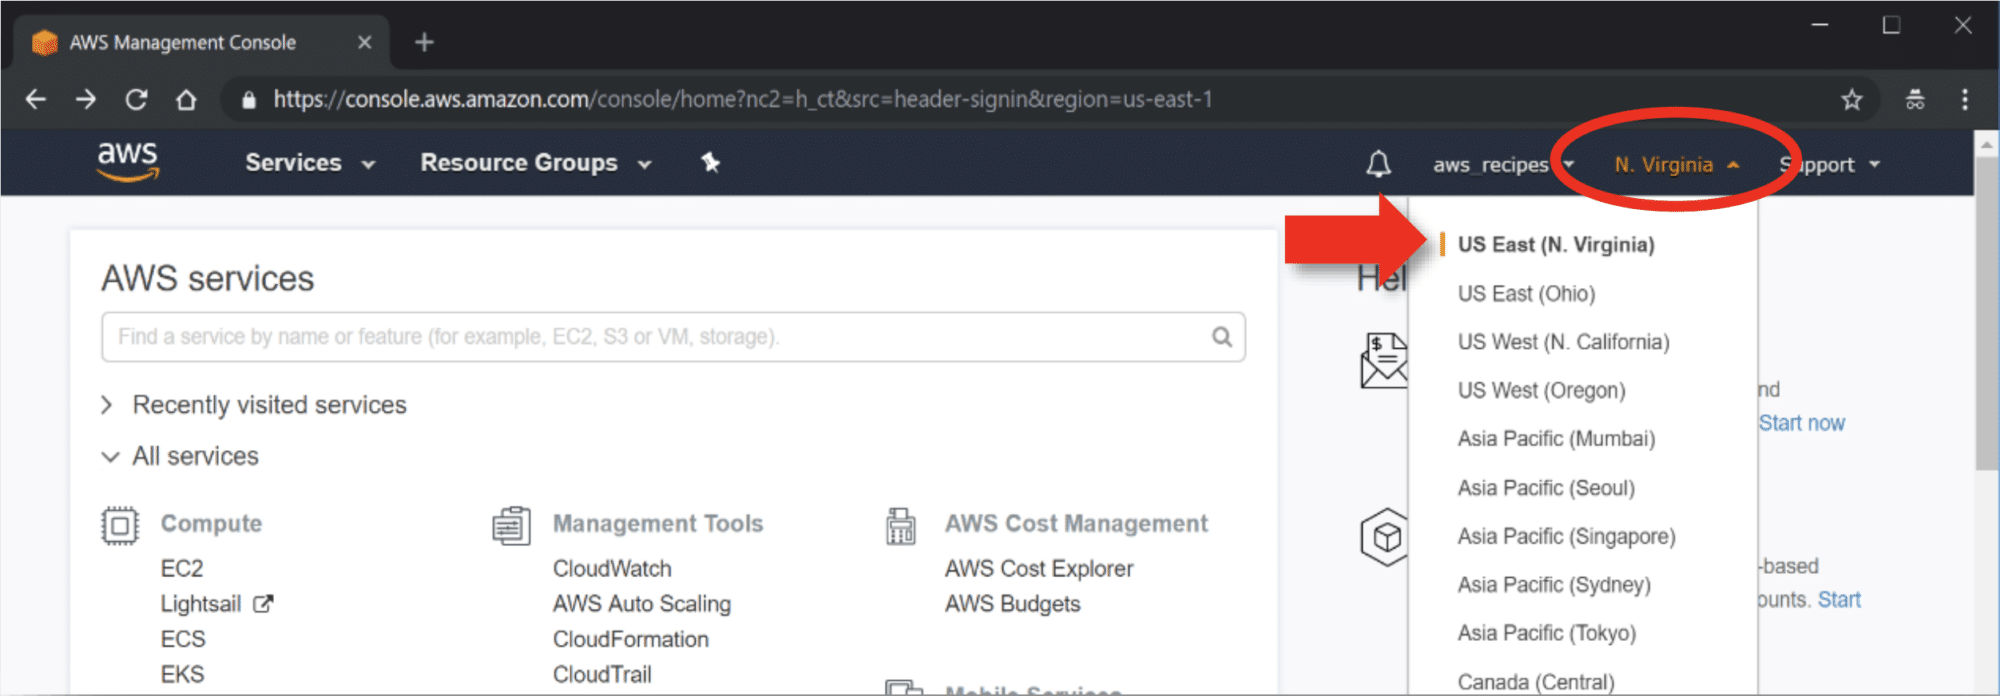
- Make sure you are in the U.S. East (N. Virginia) region.
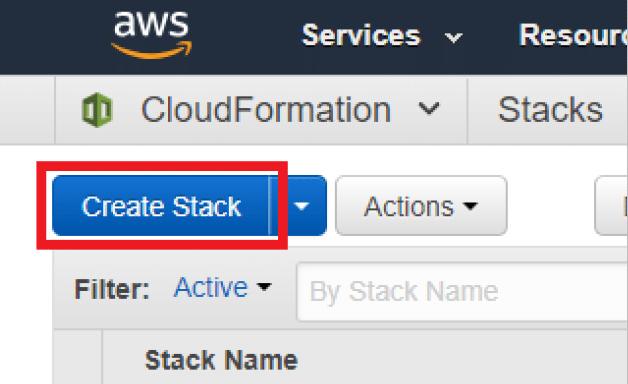
- Click on the Services at the upper-left of the page and type “cloudformation” in the search bar, then click Enter.

- From the CloudFormation Stacks page, click on Create Stack.
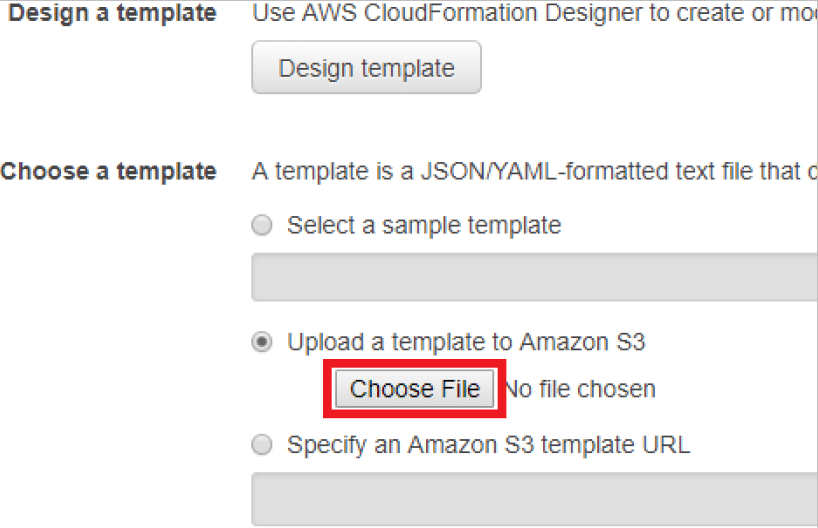
- Under Choose a template, click on the Choose File button.
- Navigate to and highlight the s1_rtc_cloudformation_OpenSource__east_v0.txt file
- Click Open or Choose to select this file
- Click on the Next button in the lower right-hand corner
- Under Choose a template, click on the Choose File button.
- Parameters page
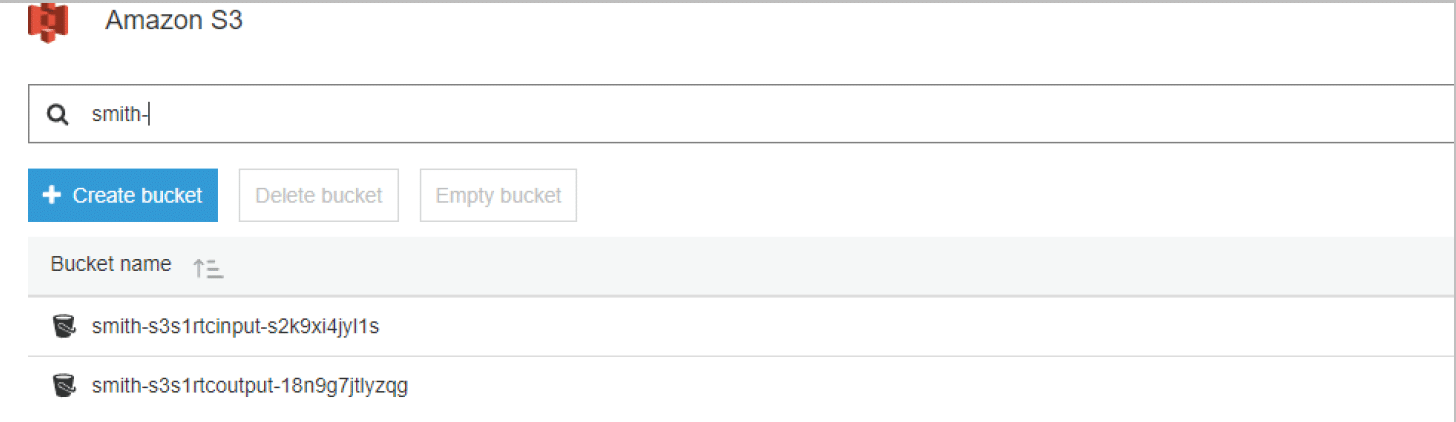
- Name your stack:
- Use this format for this tutorial: YOURLASTNAME-
- For example, a person named Mary Smith would be: SMITH-
- Use this format for this tutorial: YOURLASTNAME-
- Name your stack:
- Parameters page
Note: The hyphen at the end of your name is important!

- Select a KeyName
- Navigate to and select the private key .pem file created with your EC2 Instance by using the search bar and dropdown menu.
- Select a KeyName

- Select a SecurityGroup
- Select the security group created with your EC2 Instance using the next search bar and drop down menu.
- Select a SecurityGroup

- For SNSTopicUser, enter your email address in place of “[email protected]”
- Select one or more Subnets
- Select the subnet(s) created with your EC2 Instance using the search bar and drop down menu.
Note: If you have many subnets, click the first three.
- Click on the Next button in the lower right-hand corner.

- Options page
- Leave the default settings (don’t change anything).
- Scroll to the bottom and click on the Next button in the lower right-hand corner.
- Options page
- Review page
- Scroll down and check the box next to “I acknowledge that AWS CloudFormation might create IAM resources.”
- Click the Create button in the lower right-hand corner.
- Review page


The CloudFormation Stacks Page
In the CloudFormation Stacks page, you can see the stack that you created or are in the process of creating.
- Select your MYLASTNAME- stack in the Stack Name column

- Click on the Events tab (below the Stack Name list). Click the Refresh button to see the CloudFormation stack creation steps during the deployment.

- Wait for the stack to have the status CREATE_COMPLETE.
Note: If the status is ROLLBACK_COMPLETE then the CLoudFormation template ran into an error. You can scroll through the Events tab to see what happened. If you see an error about a resource that “did not stabilize,” then wait an hour or so and try again. This is a transient error with AWS that will eventually clear up.
Important: Check your email Inbox — you should receive an email from AWS for a subscription to CLoudWatch notifications. Click the Confirm subscription link and you will receive email notifications when your stack grows (adds EC2 Instances to do work) and shrinks (removes EC2 Instances when work is completed).
Process RTC using the CloudFormation Stack
In this section, you will upload a Sentinel-1 GRDH file to your input bucket, automatically begin RTC processing, and download the finished product from your Output bucket. While the example shows you processing a single file, you can drop many files into the Input bucket and they will process in parallel automatically.
- Once your Stack creation is complete, click on Services at the top of the page and type “S3” in the search bar and click on S3 — Scalable Storage in the Cloud.

- On the Amazon S3 page, look for two bucket names that are prefixed with your LASTNAME-. you should see:
- An Input Bucket (bucket name: LASTNAME-s3s1rtcinput- ) where configuration files, workflows, and the Sentinel-1 file to be processed are stored.
- An Output Bucket (bucket name: LASTNAME-s3s1rtcoutput- ) where the final processed product will be stored.
- On the Amazon S3 page, look for two bucket names that are prefixed with your LASTNAME-. you should see:
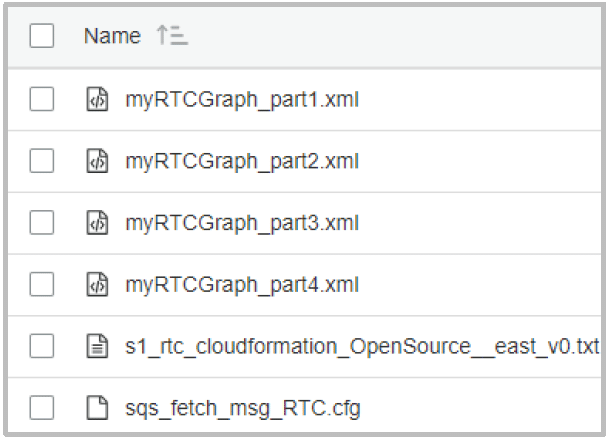
- Click on your Input bucket to see what objects are in that bucket.
- At first, you should have no objects in this bucket, but it will eventually be populated by the series of files seen to the right.
- Click on your Input bucket to see what objects are in that bucket.
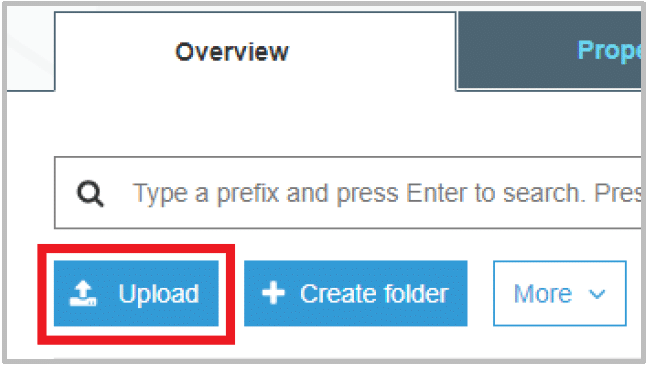
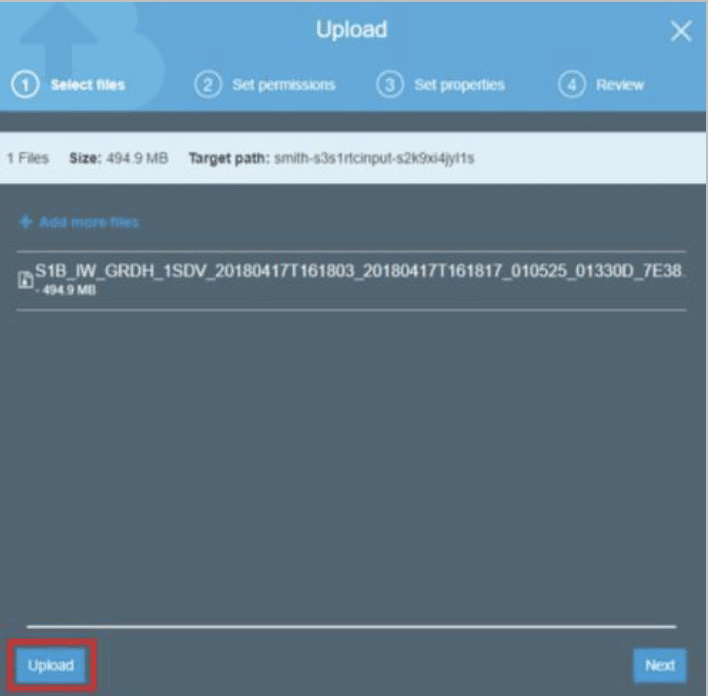
- To add a Sentinel-1 product to the Input bucket for RTC processing:
- Click on the Upload button.
- Click Add Files located in the center of the new window.
- In the file browser, navigate to and select the sample file for this tutorial, then click Open or Choose.
- Note that you can upload multiple files (by ctrl-clicking) to be processed.
- Click Upload
- You can monitor the status of the upload using the progress bar at the bottom of the window.
- To add a Sentinel-1 product to the Input bucket for RTC processing:
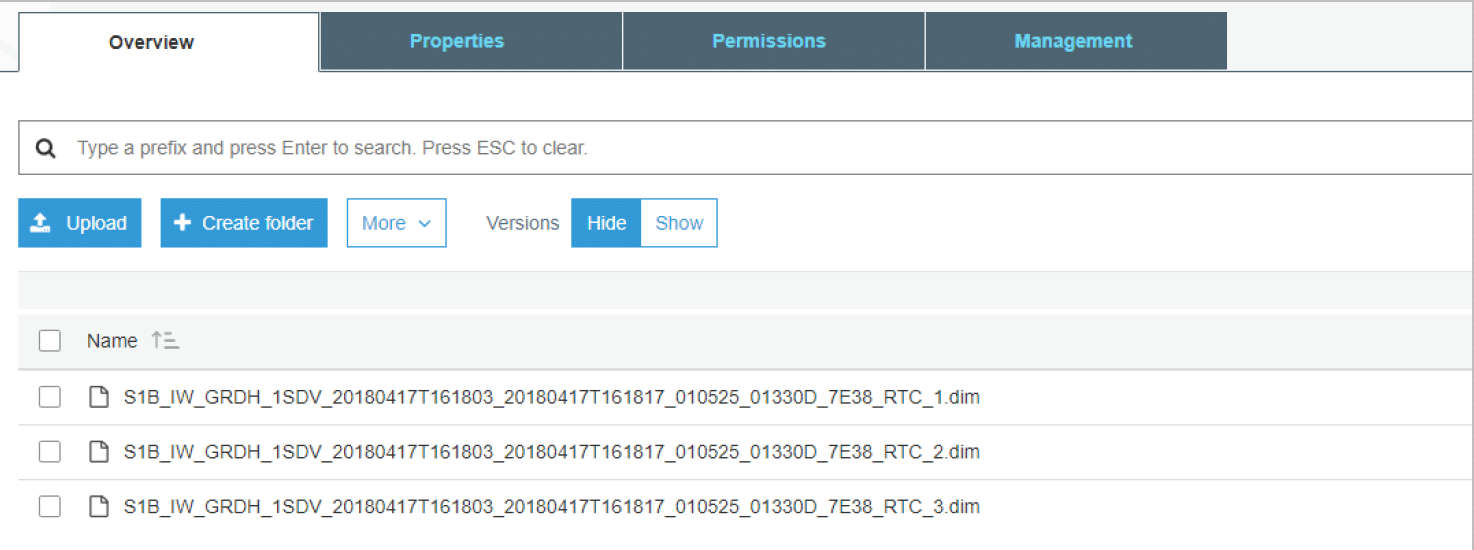
- In a few minutes, processing will automatically begin. You can watch the progress by checking the Output bucket. An intermediary file will be created for each step in the four-step processing workflow, but these intermediary files (with the file extension .dim) will be automatically removed when processing is complete.
Note: Processing was started by a CloudWatch alarm that was created during the CloudFormation stack creation. This alarm detects when a new file is added to the processing queue. Another alarm was created to detect when new Instances are created and terminated during processing. You can monitor the alarms by clicking on Services at the top of the page and typing “cloudwatch” in the search bar.
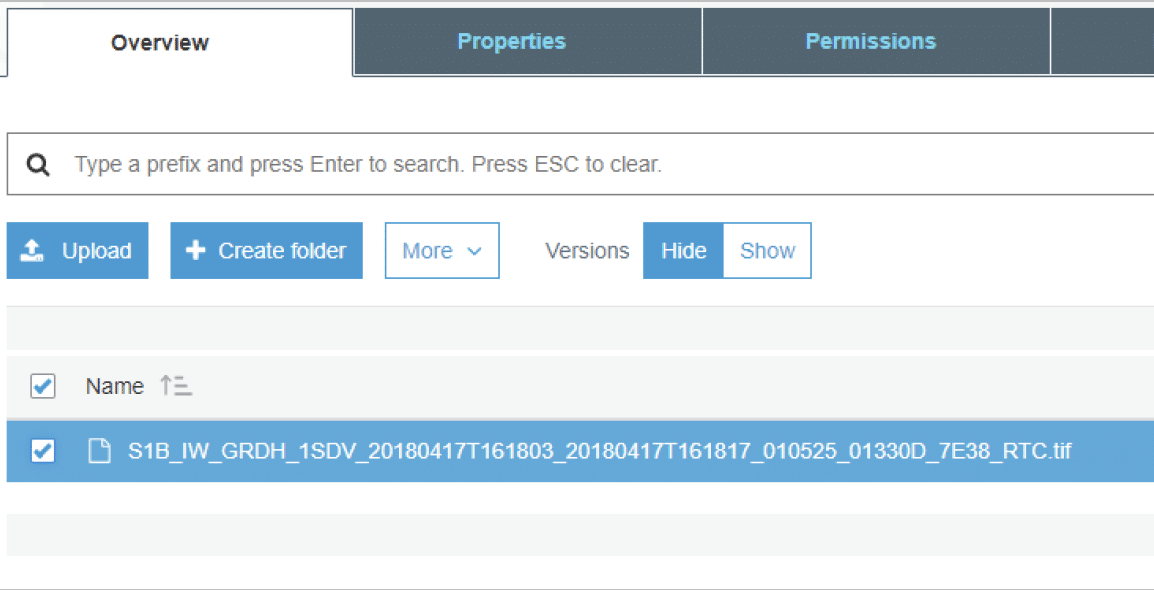
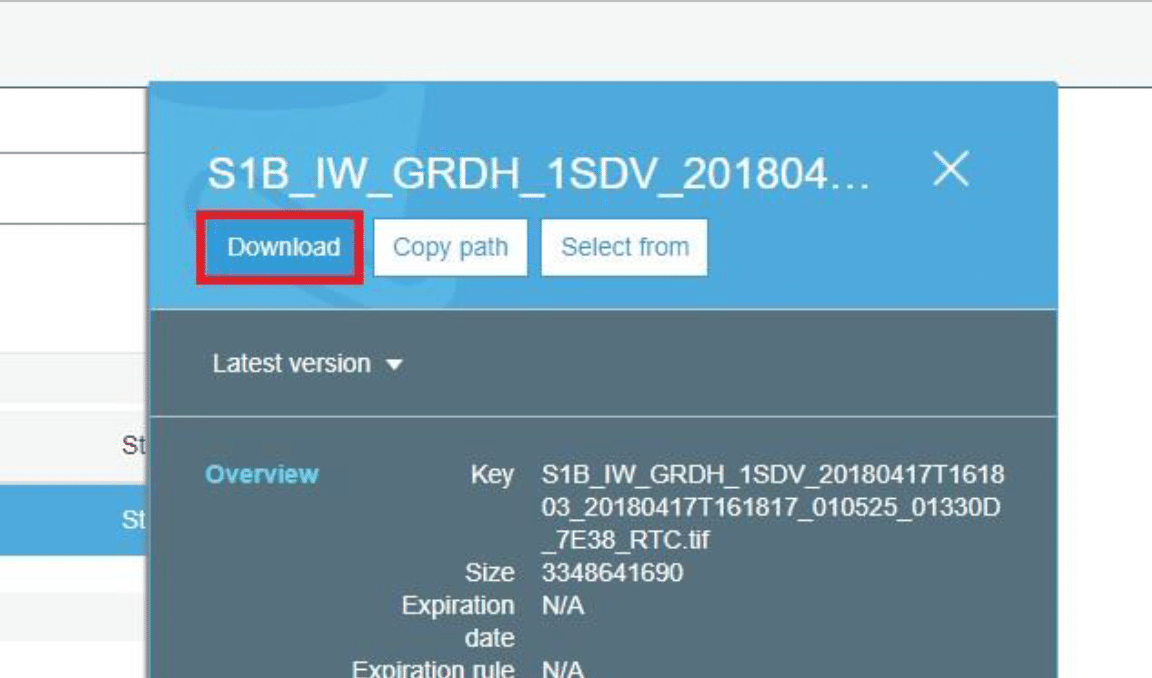
- Check your Output bucket for the finished RTC product (with file extension .tif).
- Click the checkbox next to the product to view file information and to Download the file to your computer.
Cleaning up the Stack
When processing has completed and the RTC product has been downloaded, the stack can be deleted to prevent incurring any additional charges to your account.
Always remember to download the finished product files in your Output bucket BEFORE you delete the stack!
To delete the CloudFormation Stack:
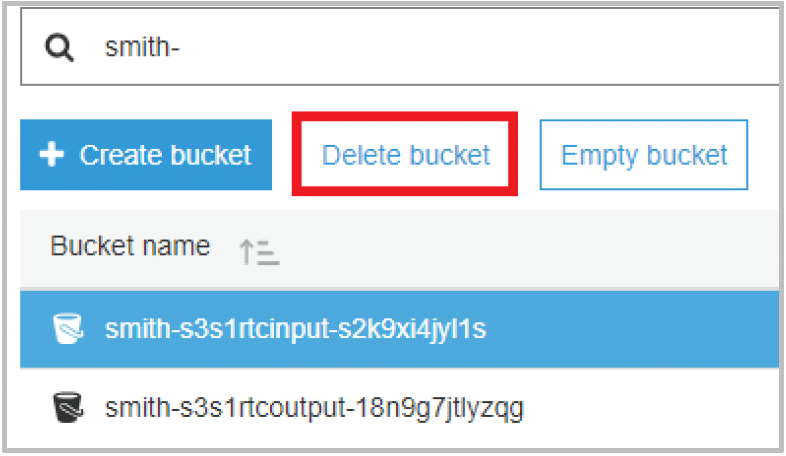
- Empty the Input and Output buckets
- Click on Services at the top of the page, type “s3” in the search bar, then Enter.
- Select the Input bucket by clicking on the icon next to the bucket name, then click the action Empty Bucket.
- Enter the bucket name (copy and paste) in the Type the name of the bucket to confirm box and click Confirm.
- Make sure the Input bucket is still selected, then click the action Delete bucket.
- Enter the bucket name (copy and paste) in the Type the name of the bucket to confirm deletion dialog and click Confirm.
- Repeat steps 2 and 3 for the Output bucket.
- Empty the Input and Output buckets

- Click on Services at the top of the page, type “cloudformation” in the search bar, then Enter.
- In the CloudFormation Stacks page, you will see all of your deployed stacks.
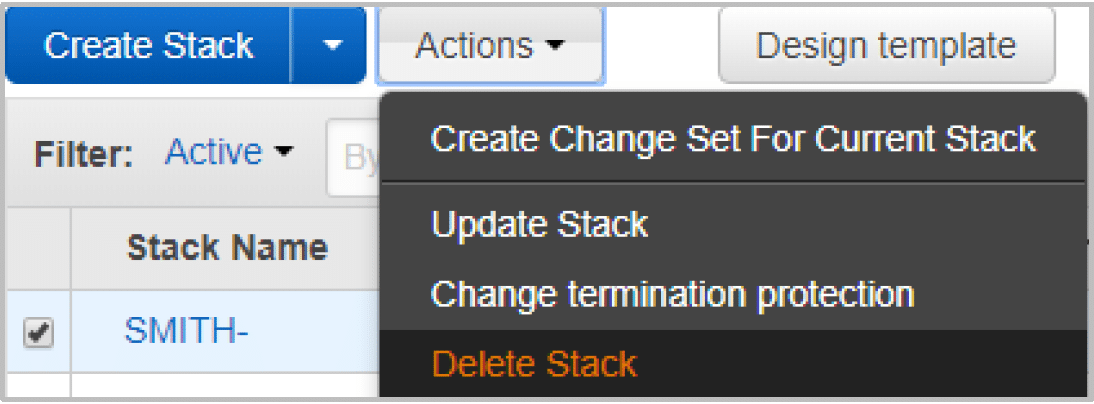
- Select the YOURLASTNAME- stack.
- Click on Actions, then select Delete Stack.
- A Delete Stack warning is displayed.
- Verify the stack name, then click the Yes, Delete button.
- Click on Services at the top of the page, type “cloudformation” in the search bar, then Enter.
- Monitor stack deletion progress by clicking on the Events tab, then the Refresh button.

- When the stack disappears from the Stack Name list, the deletion is complete.
Note: You can always redeploy the stack using the Template and run additional processing at any time. So don’t worry if you deploy, then delete, then redeploy this template many times. That is the intent of the template.
Important: If you keep files in an S3 bucket, you will be charged a monthly fee for storing them!