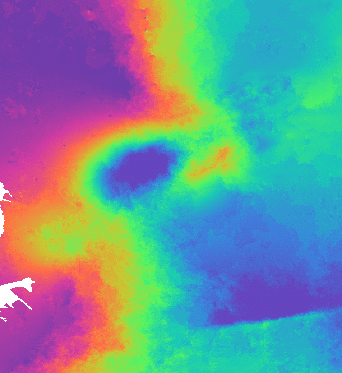
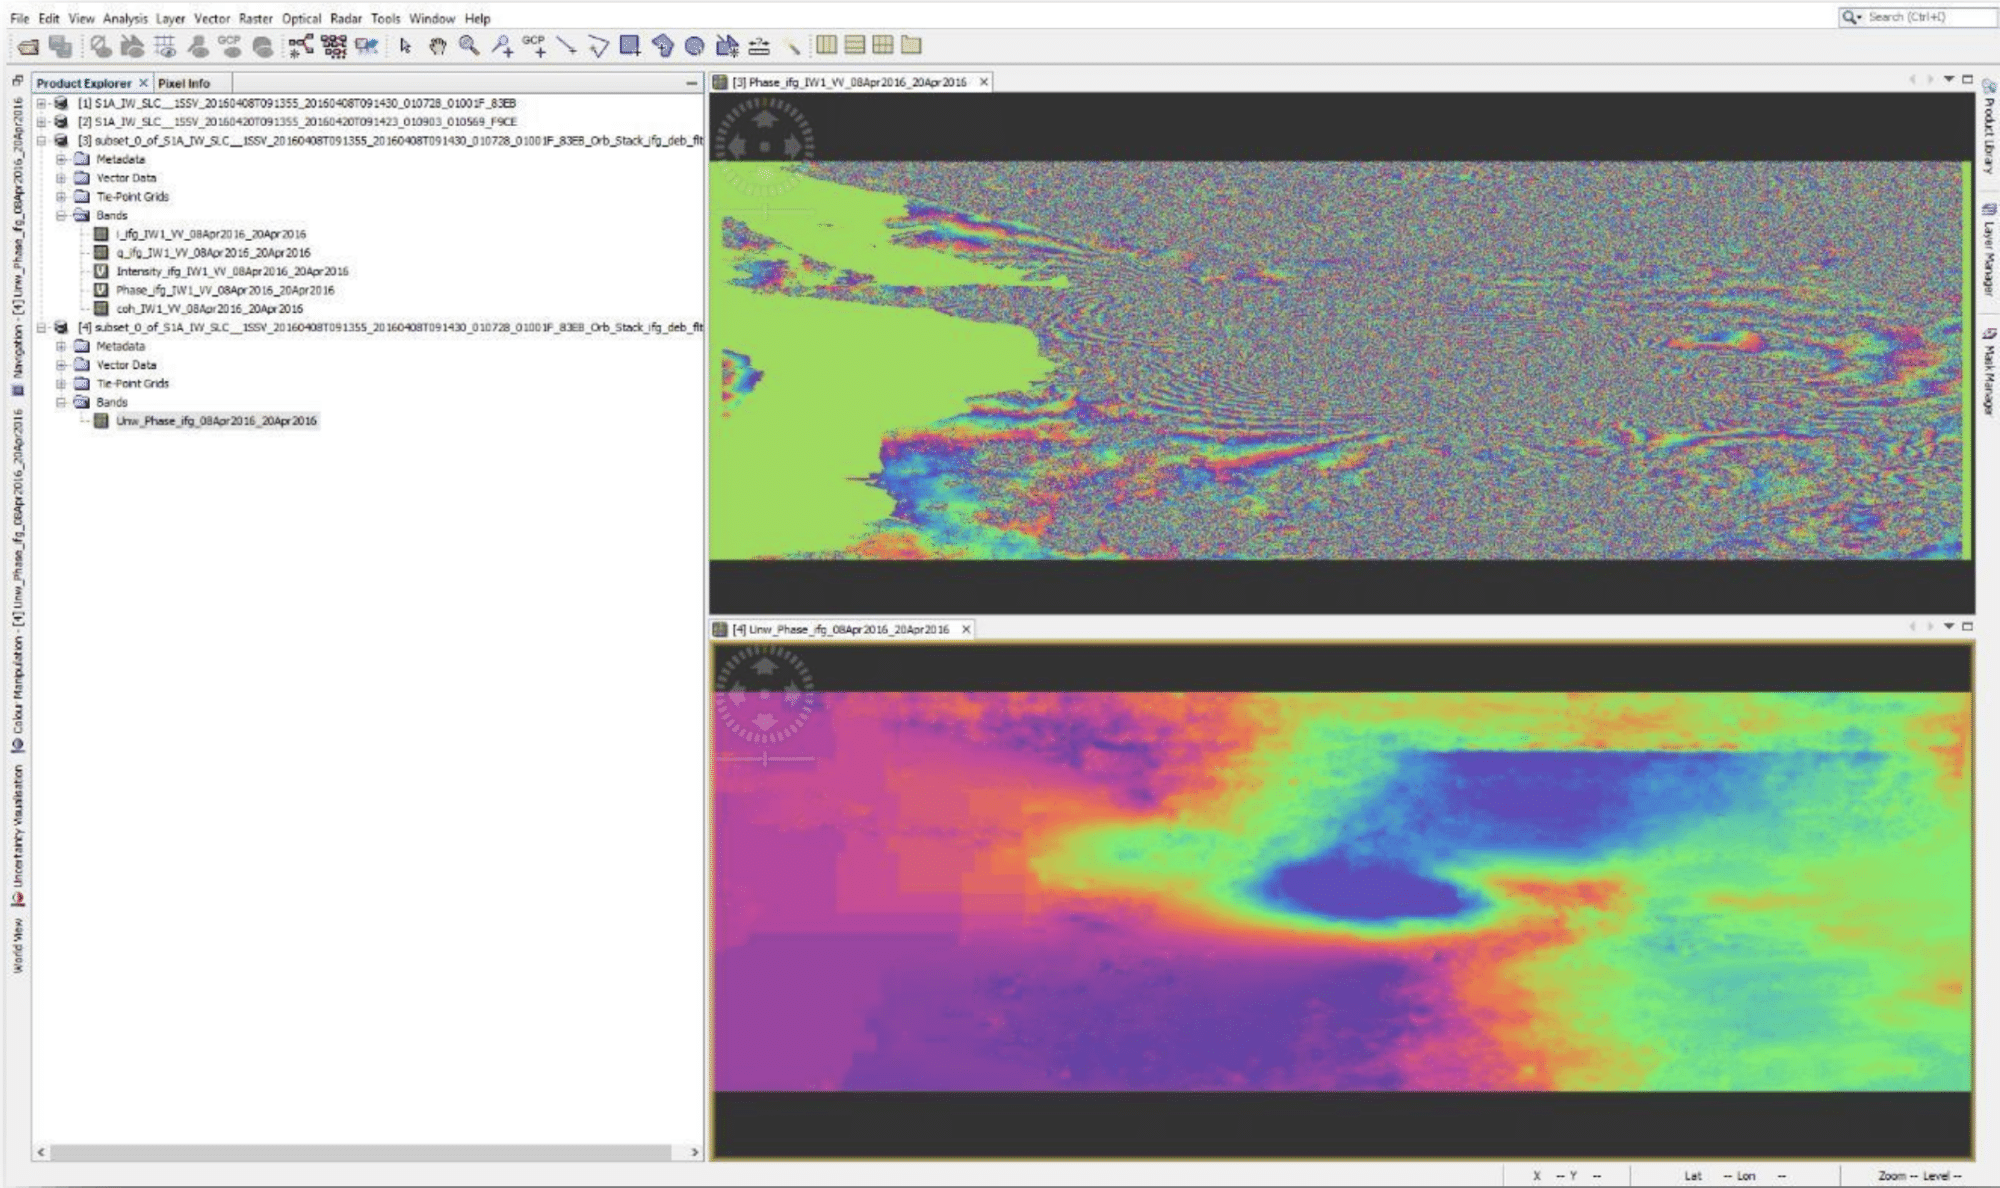
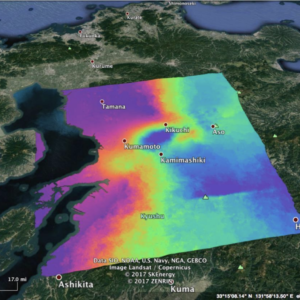
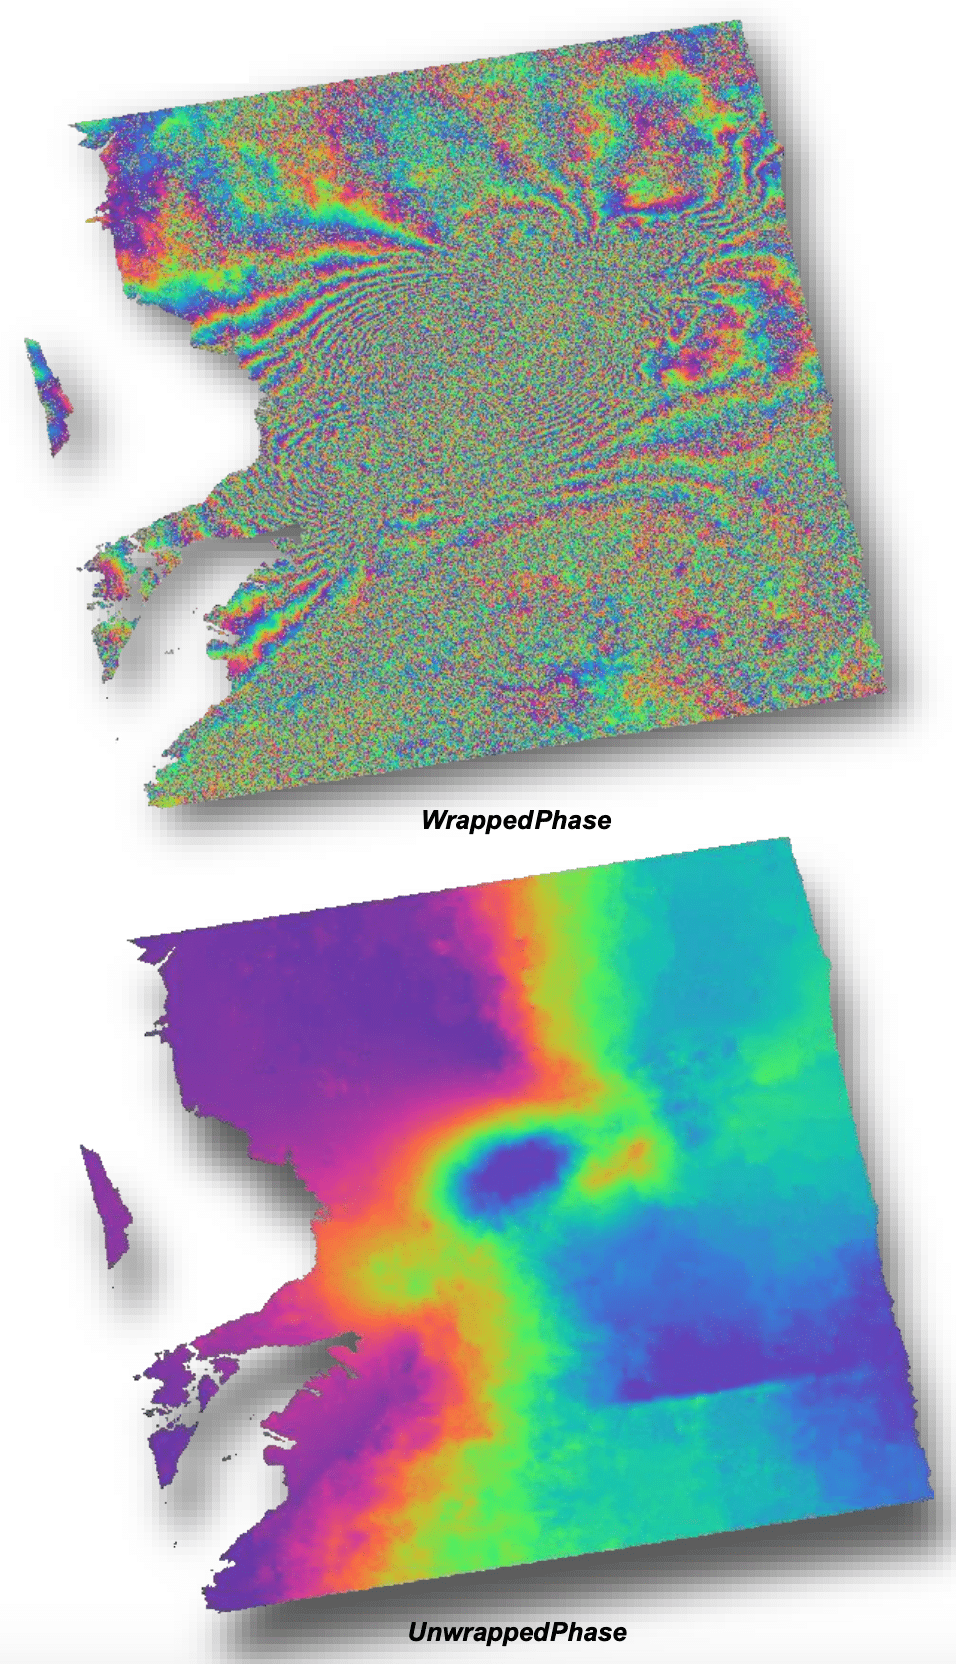
The unwrapped phase image above of the 2016 Kumamoto Earthquake shows displacement clearly after multi-looking and phase filtering were applied. Contains modified Copernicus Sentinel data 2016, processed by ESA.
Background
This data recipe is a continuation of ASF’s How to Create an Interferogram using ESA’s Sentinel-1 Toolbox recipe. It provides instructions for “unwrapping” the interferogram generated in that recipe. Once an interferogram is unwrapped, height values can be derived from the product for use in further processing, such as generating deformation maps or DEMs.
Phase unwrapping is the most complicated stage of interferometric data processing. In this recipe, we will use SNAPHU, which is a two-dimensional phase unwrapping algorithm developed by Chen and Zebker. The software is publicly available and should run on most Unix/Linux platforms.
The interferometric phase is ambiguous and only known within 2π. In order to be able to relate the interferometric phase to the topographic height, the phase must first be unwrapped. The altitude of ambiguity ha is defined as the altitude difference that generates an interferometric phase change of 2π after interferogram flattening.
Phase unwrapping solves this ambiguity by integrating phase difference between neighboring pixels. After deleting any integer number of altitudes of ambiguity (equivalent to an integer number of 2π phase cycles), the phase variation between two points on the flattened interferogram provides a measurement of the actual altitude variation.
Prerequisites
Materials List
- Linux or Unix. Windows users have several options to access a Linux machine:
- Establish a virtual machine (VM), install a Linux operating system on the VM, and use it to run the SNAPHU processing portion of the recipe.
- Download virtual machine (VM) software such as VirtualBox or VMware.
- Download an Operating System such as LinuxMint.
- Launching an Amazon EC2 Linux Instance through Amazon Web Services (AWS).
- Sentinel-1 Toolbox (S1TBX).
- Statistical-cost, Network-flow Algorithm for Phase Unwrapping (SNAPHU).
- InSAR Data (continuation from the “How to Create an Interferogram using ESA’s Sentinel-1 Toolbox” data recipe), including the coherence band for your interferogram.
System Requirements
- Linux/Unix computing system, or access to a Virtual Linux environment (see Materials List)
- At least 16 GB memory (RAM)
Many of the steps take a very long time to process. Consider closing other applications and avoid using the computer while products are processing.
Note: A Solid State Drive will perform significantly faster than a Hard Disk Drive and when processing large files, this will be very advantageous.
If you encounter an error in the middle of a processing step, it may be because your disk is full. If you are using a Virtual machine, be sure to partition enough space for the virtual installation.
Pre-Unwrapping Steps
This data recipe assumes that you have already generated your interferogram using the Sentinel-1 Toolbox as shown in the image below and would like to follow the unwrapping process. Note that the last step should be Phase Filtering; the product should not be Geocoded (Terrain Corrected) before unwrapping.

For optimal unwrapping results, it is recommended to multi-look (i.e., square) and phase-filter (i.e. increase signal-to-noise and smooth) the interferogram, as instructed in the How to Create an Interferogram using ESA’s Sentinel-1 Toolbox recipe.
Note: When performing the multi-look process for data that will be used for phase unwrapping, the coherence band (coh) must be included along with the i and q bands.
The quality and reliability of unwrapped results strongly depends on the input coherence. Reliable results can only be expected in areas with high coherence.
Open Your Interferogram in Sentinel-1 Toolbox
- Open Sentinel-1 Toolbox (search for SNAP in your programs) and make sure that the Product Explorer window is open (if it is not displayed, select Tool Windows from the View menu in Sentinel-1 Toolbox and click on the Product Explorer option).
- Use the Open Product button and navigate to your interferogram (.dim file).
- If you’ve used the default suffixes during processing, the desired product will be tagged _Orb_Stack_ifg_deb_dinsar_ML_flt.dim
- If you performed Terrain Correction on the interferogram, be sure to select the product generated before that step was performed (the product should not be tagged with _TC).
- Double-click on the product in the Product Explorer to expand the product, and double-click on the Bands folder to view the product bands.
- Double-click on the Phase band to view your interferogram
- If desired, zoom in using the mouse wheel, or using the Navigation tab in the lower-left corner of the Sentinel-1 Toolbox interface (if it is not displayed, select Tool Windows from the View menu and click on the Navigation option).
Create a Subset (Optional)
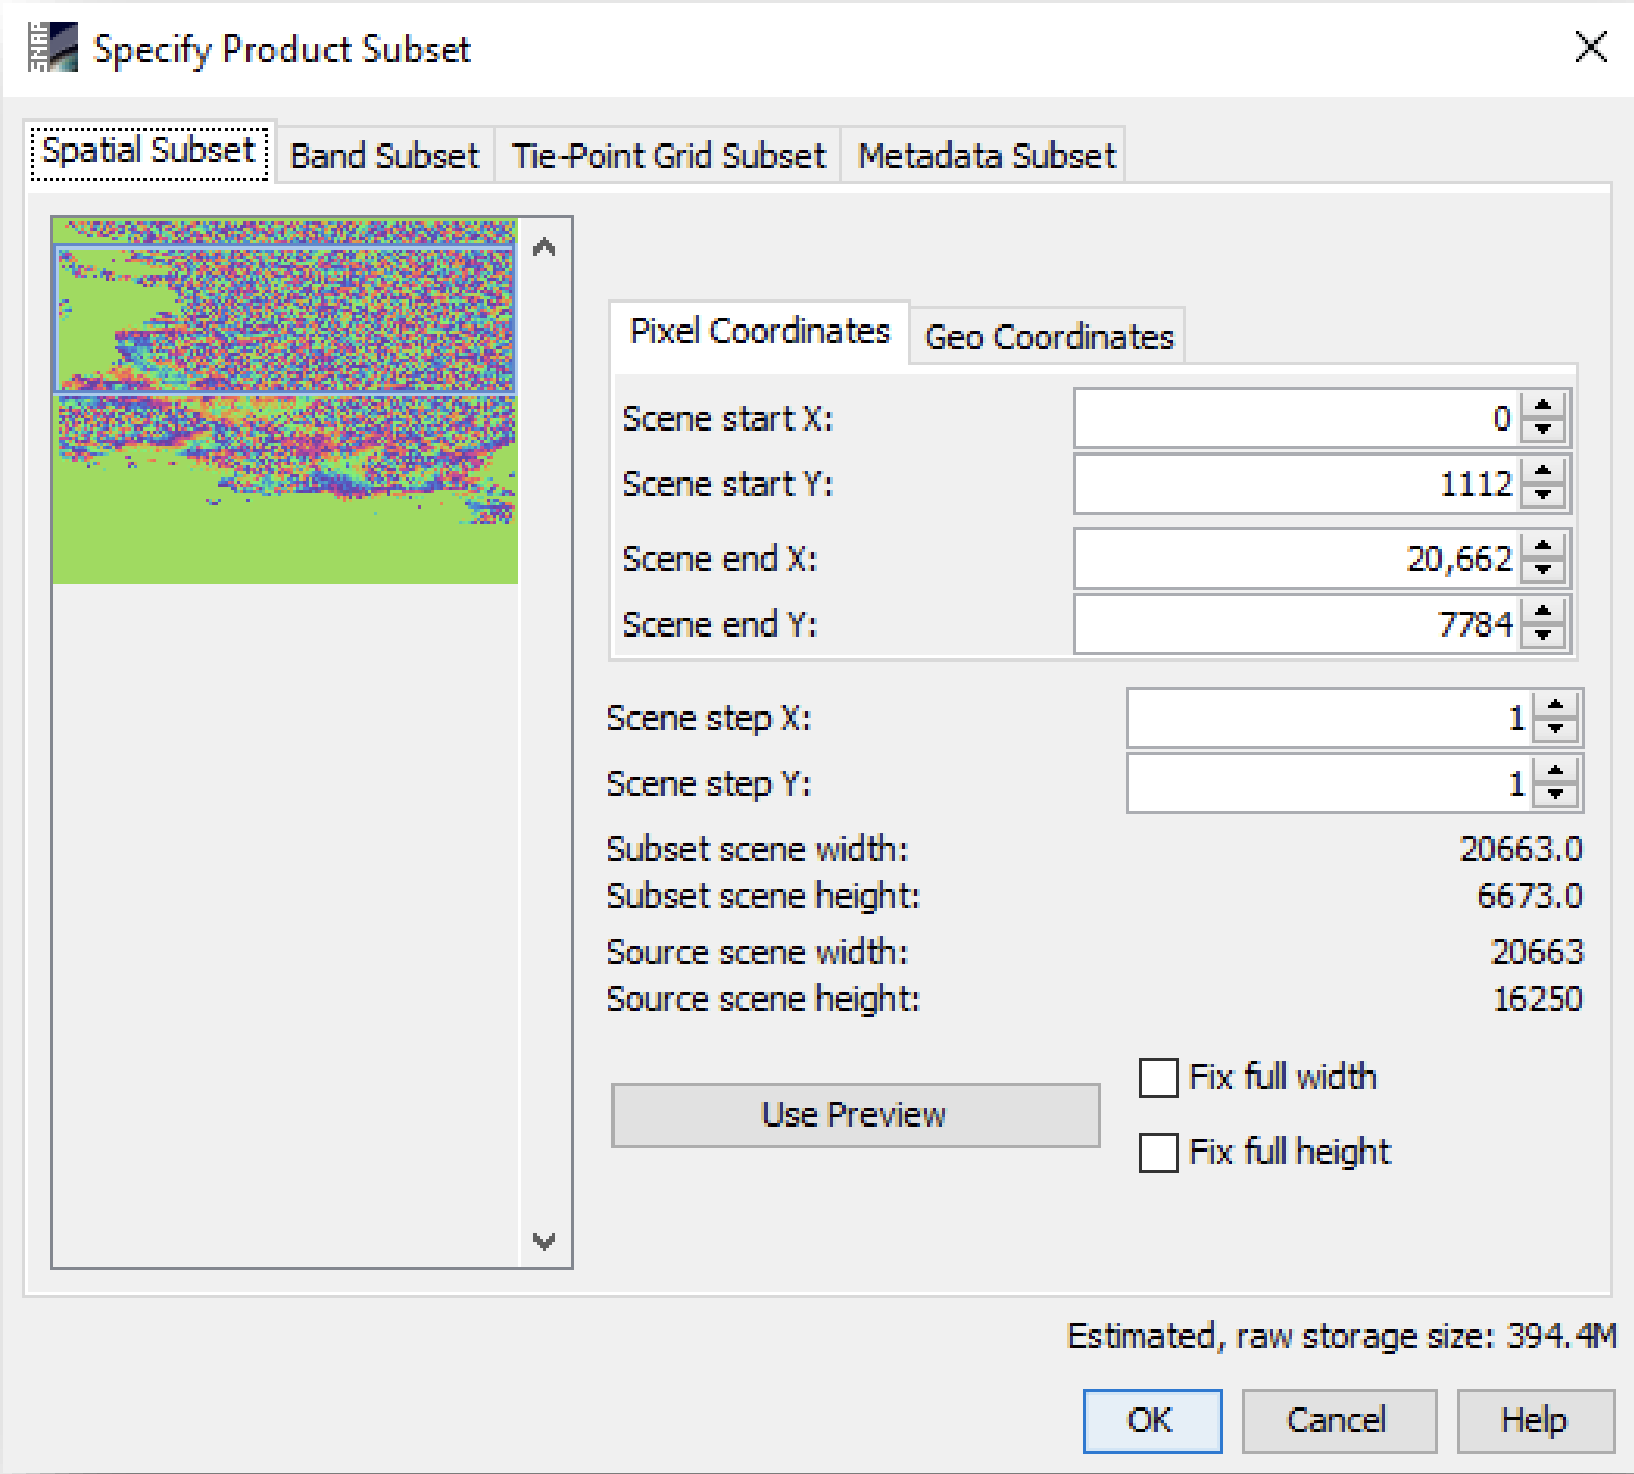
To reduce the amount of processing required, you may wish to create a subset of a smaller area within the granule, especially if you have a specific area of interest.
- Zoom in and pan to your area of interest.
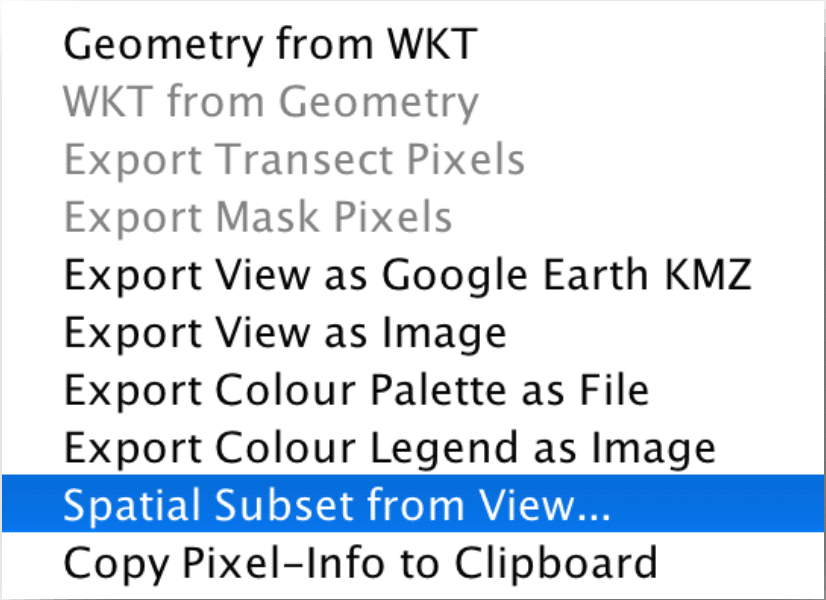
- Right-click the image and select Spatial Subset from View from the context menu.
The subset dialog box will automatically select the area you were viewing. To adjust the extent of your subset image, you may drag the bounding box, enter the pixel coordinates, or add geo-coordinates.
- Click OK to create the subset.
By default, all bands will be included in the subset output (Band Subset tab). For phase unwrapping, both the phase and coherence bands must be included.
When the new subset appears in the Product Explorer window:
- Right-click on the product and select Save Product in the context menu.
- Click the Yes button to convert the product to the BEAM-DIMAP format and save it to disk in your desired destination folder.
Export to SNAPHU
- Select the product from the Product Explorer tab
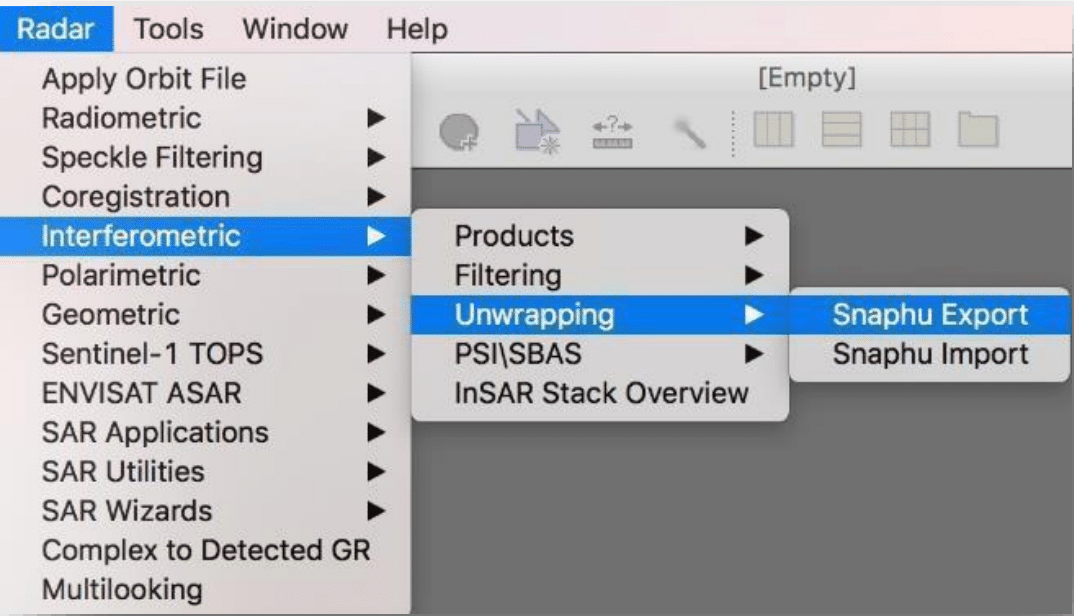
- Navigate to: Radar > Interferometric > Unwrapping > Snaphu Export
- In the Snaphu Export tab type in the folder directory in the Target Folder box.
- We recommend creating a separate folder for this step.
- Select DEFO for deformation mapping
- To speed up the unwrapping process, you may increase the number of processors (this depends on the CPU you have)
- Click Run to create SNAPHU export folder
Using a Virtual Machine
Install and open a Linux VM
If you do not have a Linux OS, you will need to install a Linux Virtual Machine to operate SNAPHU (See Prerequisites).
Transfer in the SNAPHU Export files
You will need to make the Snaphu Export files generated in the previous section available within your Linux environment.
- Zip the Snaphu Export files generated on your PC or Mac using Sentinel-1 Toolbox, and make the zip folder(s) accessible to SNAPHU software in the Linux environment. Approaches include:
- Place the files in Google Drive or Dropbox and download them from within Linux.
- Email the images to yourself and retrieve them in Linux.
- Extract the SNAPHU Export file to the desired directory in your Linux environment (you may want to create a new folder for your project).
Unwrapping with SNAPHU
SNAPHU was developed at Stanford University by Curtis Chen and Howard Zebker.
Linux users simply need to open a command line; VM users need to start their Linux VM and open the command line in that environment.
If you have already installed SNAPHU, skip to the Extract the Snaphu Command step.
Install SNAPHU
Install the software by typing the following command in the command line and hitting Enter:
If a user is not granted root access (the install snaphu command results in an Access error), use the following command, which will then prompt for the user’s password for Linux (or the Linux VM) and allow the user the elevated privileges required for installing the software:
sudo apt-get install snaphu
Extract the SNAPHU Command from the Configuration File
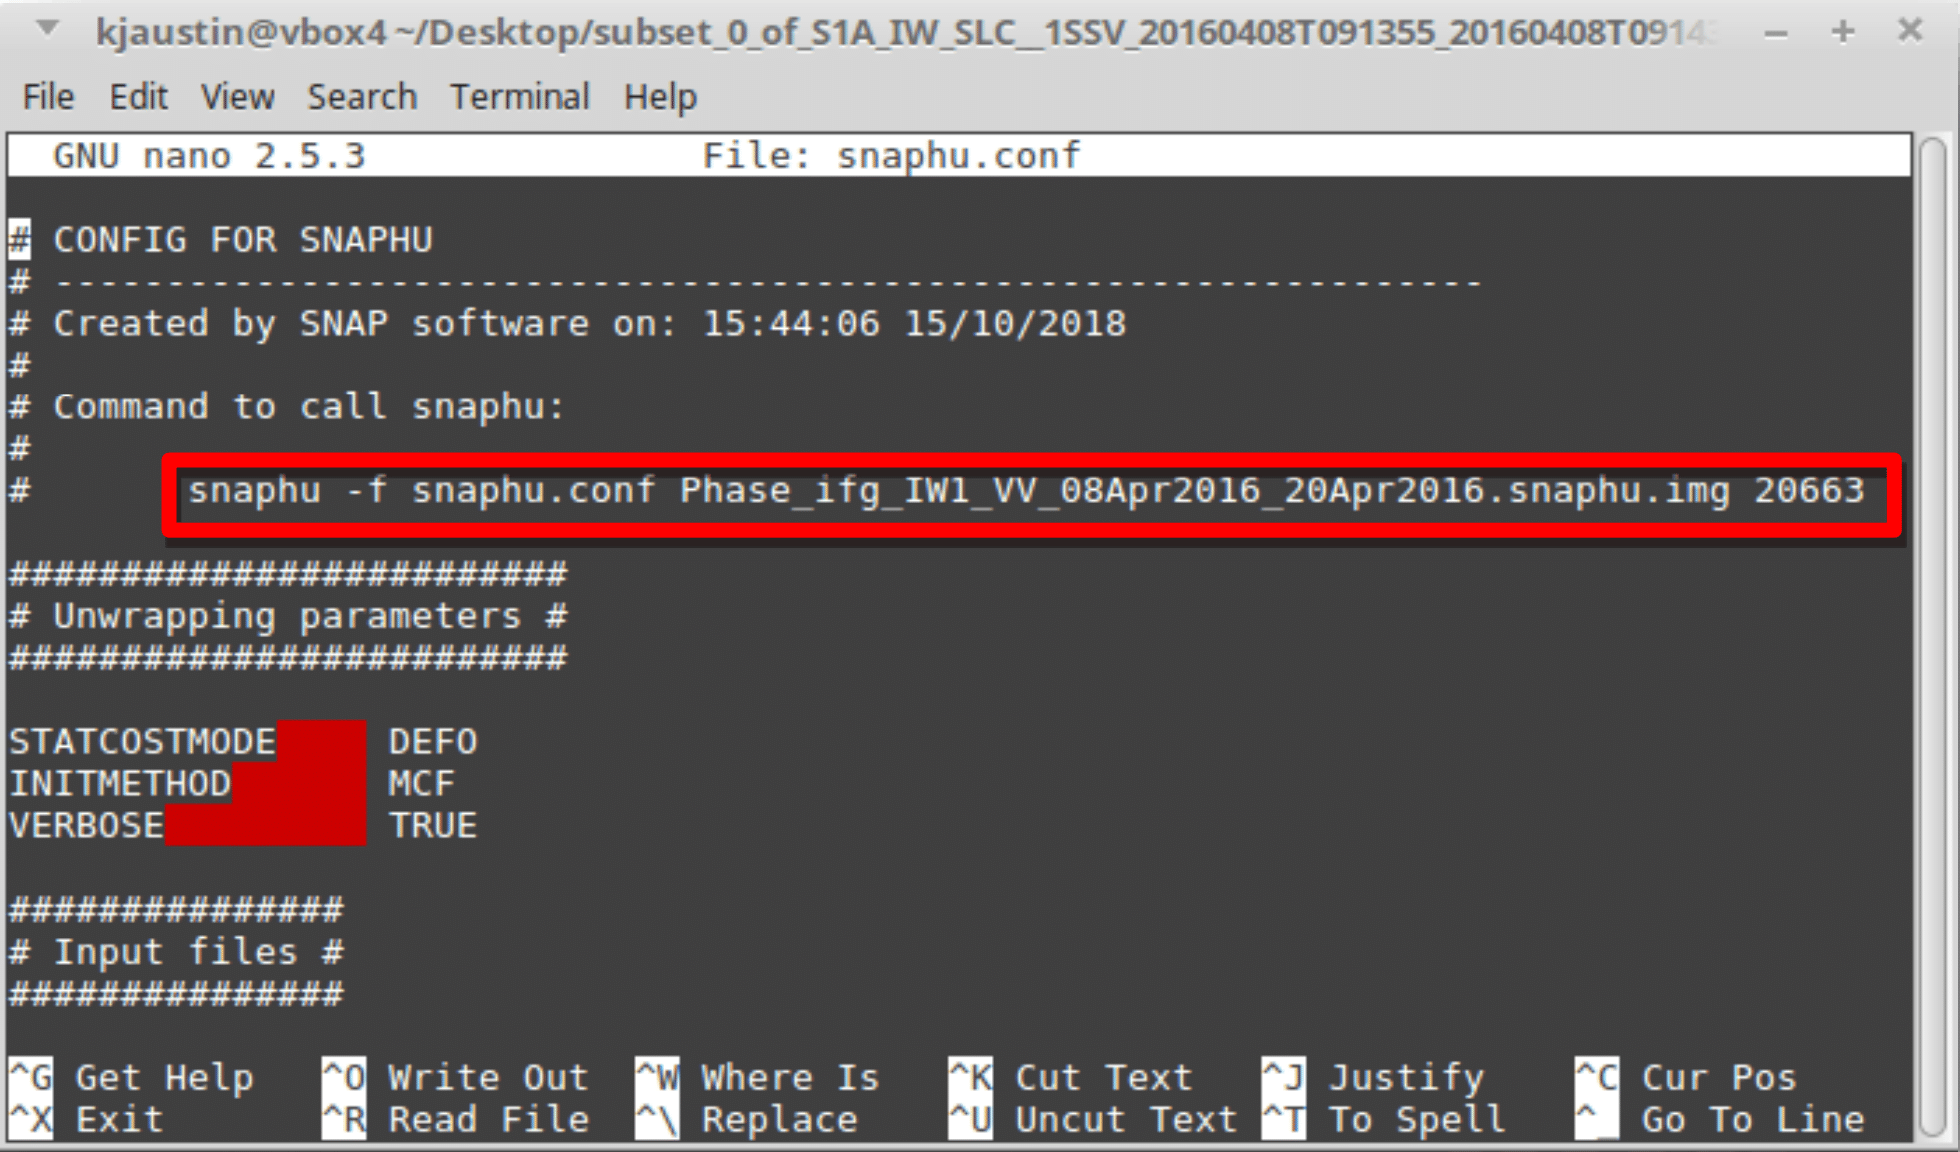
The SNAPHU product exported from Sentinel-1 Toolbox contains a configuration file with a command to call SNAPHU. This command can be extracted from the configuration file and pasted into the command line to run the SNAPHU process correctly for your interferogram.
- In the Command Terminal (in the Linux environment), use the cd command to move into the directory containing the unzipped SNAPHU Export files from Sentinel-1 Toolbox; i.e., if you put the product in a folder called SNAPHU:
cd ~/SNAPHU/S1A_IW_SLC__1SSV_20160408T091355_20160408T091430_010728_01001F_83EB_Orb_Stack_ifg_deb_mrg_dinsar_ML_flt
- Use the following command or use a text-only editor of your choice to open the configuration file (snaphu.conf) located inside the export folder:
- Copy the command from the config file.
- You might need to use the right-click option for copying rather than Ctrl-C.
- Copy the command from the config file.
- The text of interest is in the following format:
snaphu –f snaphu.conf YOUR_PHASE_BAND.snaphu.img XXXX
- Exit the config file by typing Crtl+X
Run the SNAPHU Command
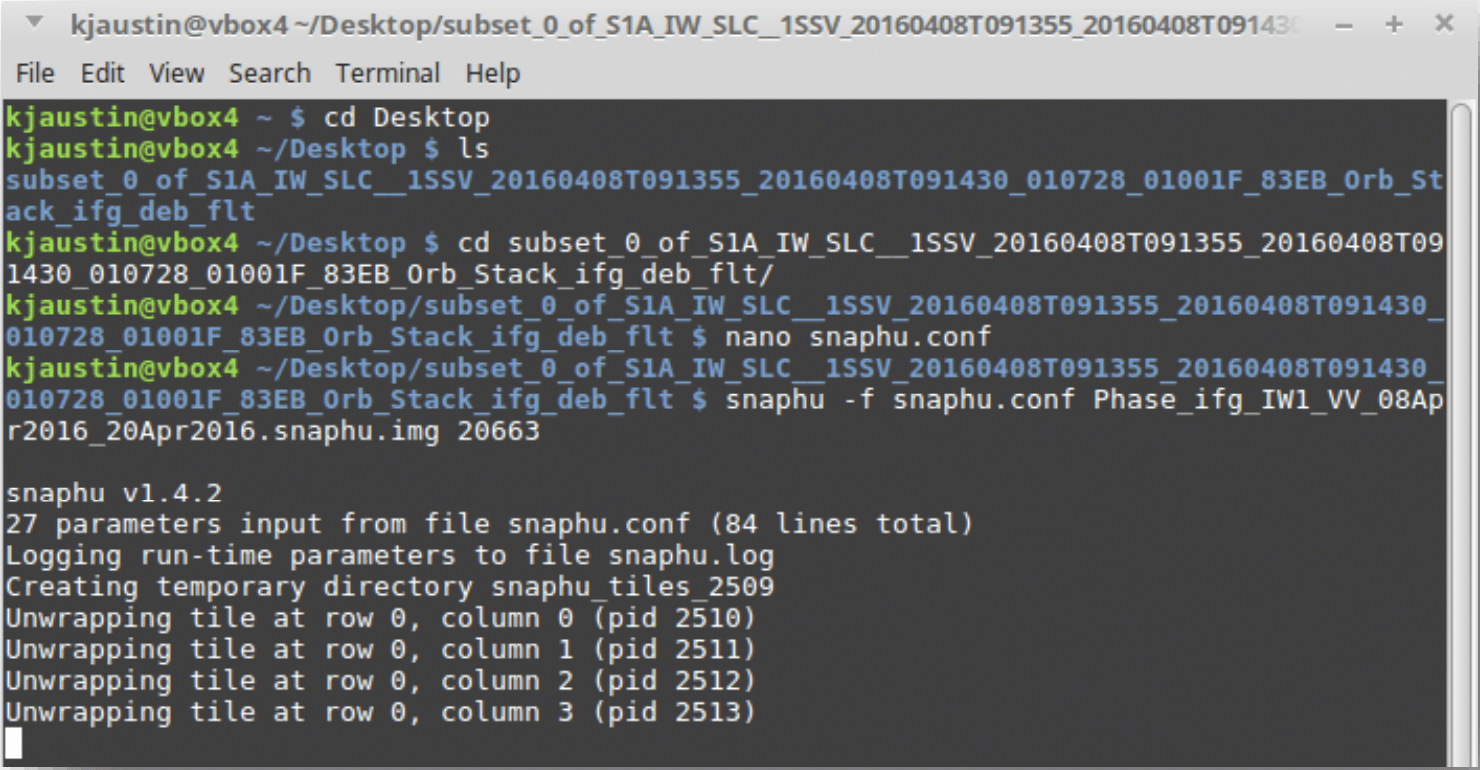
- Paste the copied text into the command line and hit Enter
- You might need to use the right-click option for pasting rather than Ctrl-V.
Note: Execution time depends on the size of the interferogram. Unwrapping can use a lot of memory. If the unwrapping fails due to insufficient memory, you may wish to create a subset of your area of interest and try again. You may also be able to increase the size of your Virtual Machine.
Make output files available to Sentinel-1 Toolbox
Files are output to the same folder containing the input files (and snaphu.conf) and are prefixed with UnwPhase. There is a header file (.hdr) and an image file (.img).
Zip the UnwPhase hdr and img output files. If using a VM, make the zipped folders accessible to your PC or Mac (Google Drive, Dropbox, email, etc.) and download them to a location accessible by Sentinel-1 Toolbox. Extract the files from the zipped folder.
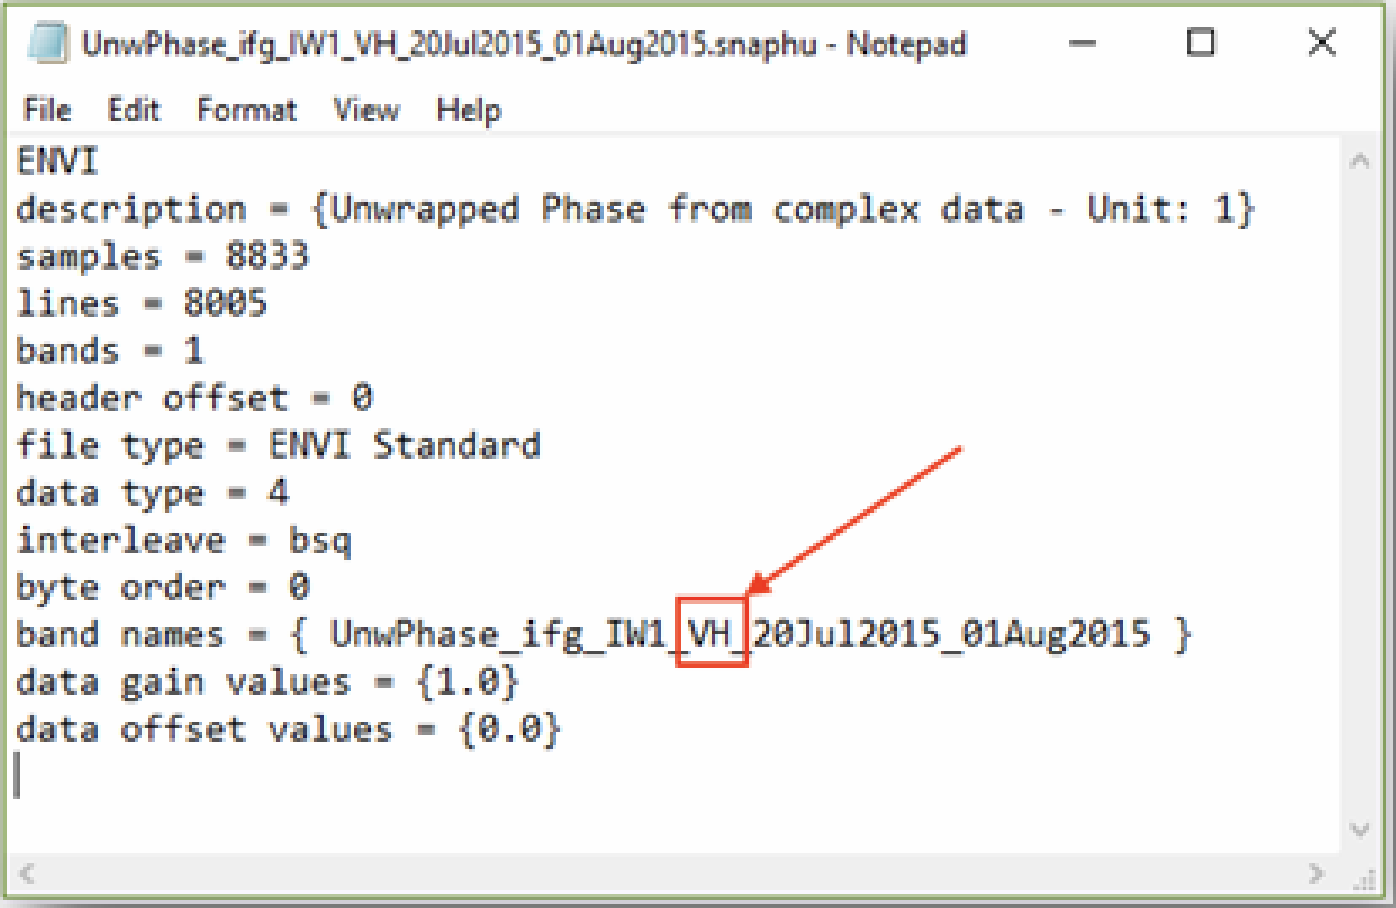
- Check the .hdr and .img filenames for a possible mismatch.
- A bug may cause a filename and contents mismatch between the .hdr and .img files, specifically in the polarization (VV vs. VH).
- Mismatched filenames and contents will cause processing failures.
- If this error is present, see the Defect Warning and Work-Around section below.
Optional — Defect Warning and Work-Around
Work-around: If the polarization in the .hdr filename does not match the .img filename, edit the .hdr filename and contents to match the .img filename and contents polarization. Example below:
- Edit the .hdr filename:
UnwPhase_ifg_IW1_VH_20Jul2015_01Aug2015.snaphu.hdr
- To match the polarization in the .img filename:
UnwPhase_ifg_IW1_VV_20Jul2015_01Aug2015.snaphu.img
- Edited .hdr filename:
UnwPhase_ifg_IW1_VV_20Jul2015_01Aug2015.snaphu.hdr
- Use a text editor to open the .hdr file and edit the .hdr contents polarization to match the polarization of the .img file.
Post-Unwrapping Steps
This section assumes you have your interferogram from Pre-Unwrapping Steps — Export to SNAPHU, still open in Sentinel-1 Toolbox. If you do not, please open your product before proceeding.
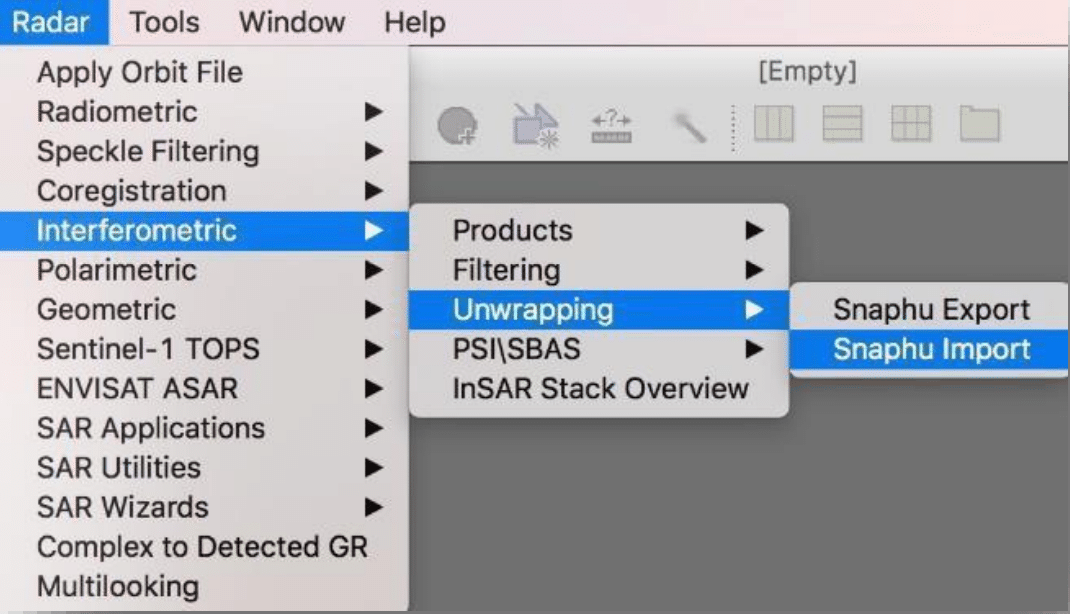
Snaphu Import
- Navigate to Radar > Interferometric > Unwrapping > Snaphu Import
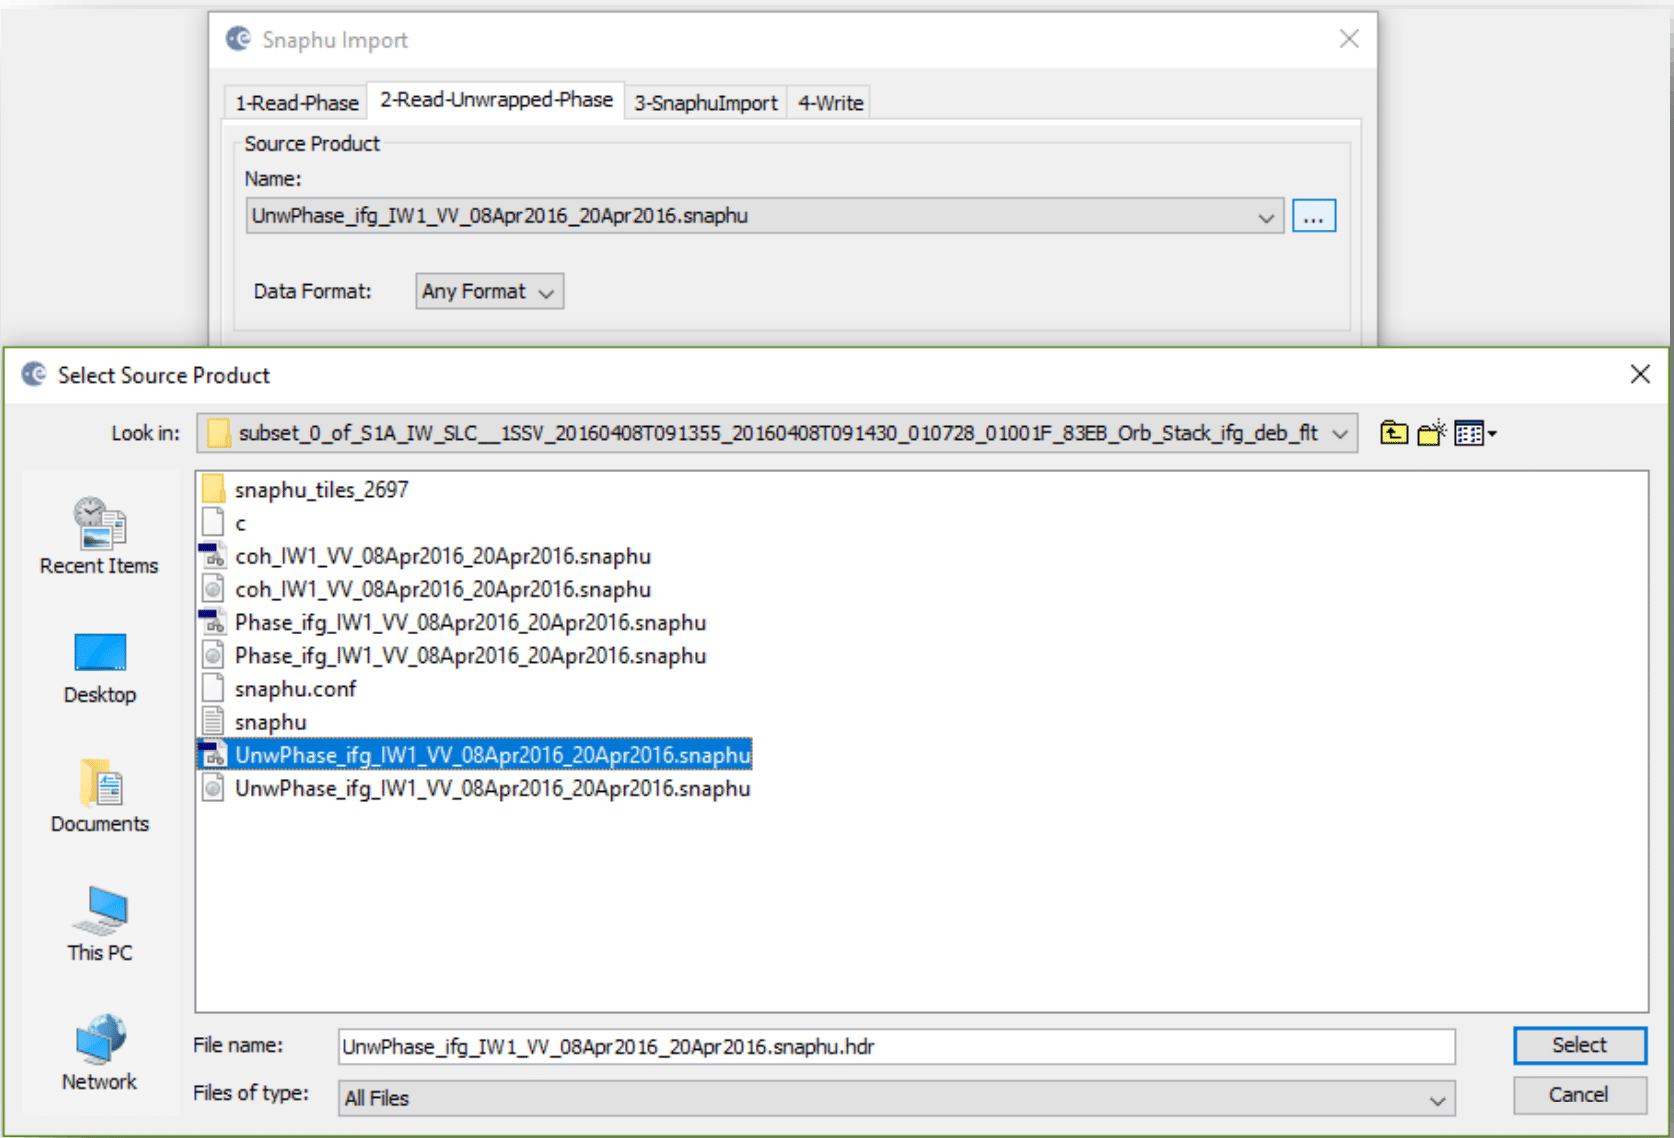
- In the Snaphu Import window:
- In the Read Phase tab, select the interferogram product
- In the Read Unwrapped Phase tab, navigate to your Snaphu export folder and select the UnwPhase_XXX.hdr file
- Exported products must be extracted if they were transferred in a zip file.
- If you want to generate an unwrapped product without including any of the other bands from the source interferogram, check the Do NOT save Wrapped interferogram in the target product option in the Snaphu Import tab. The default is to keep all the source bands in the output.
- In the Write tab, enter the desired output filename.
Geocoding
At this point, you may view your Unwrapped Phase product. However, you will notice that areas of no-elevation incorrectly appear as having data in the Unwrapped Phase image. To fix this, we will terrain-correct and geocode the unwrapped data.
Note: This step only needs to be performed if the Unwrapped Phase product is your end product. If you will be continuing on to generate a deformation map using ASF’s Deformation Recipe, you do not need to geocode your product.
If you choose to geocode your product before continuing with the Deformation Mapping recipe, make sure to use the output from the Snaphu Import step as your starting point in the Deformation recipe, rather than the Geocoded/Terrain Correct product generated in this step.
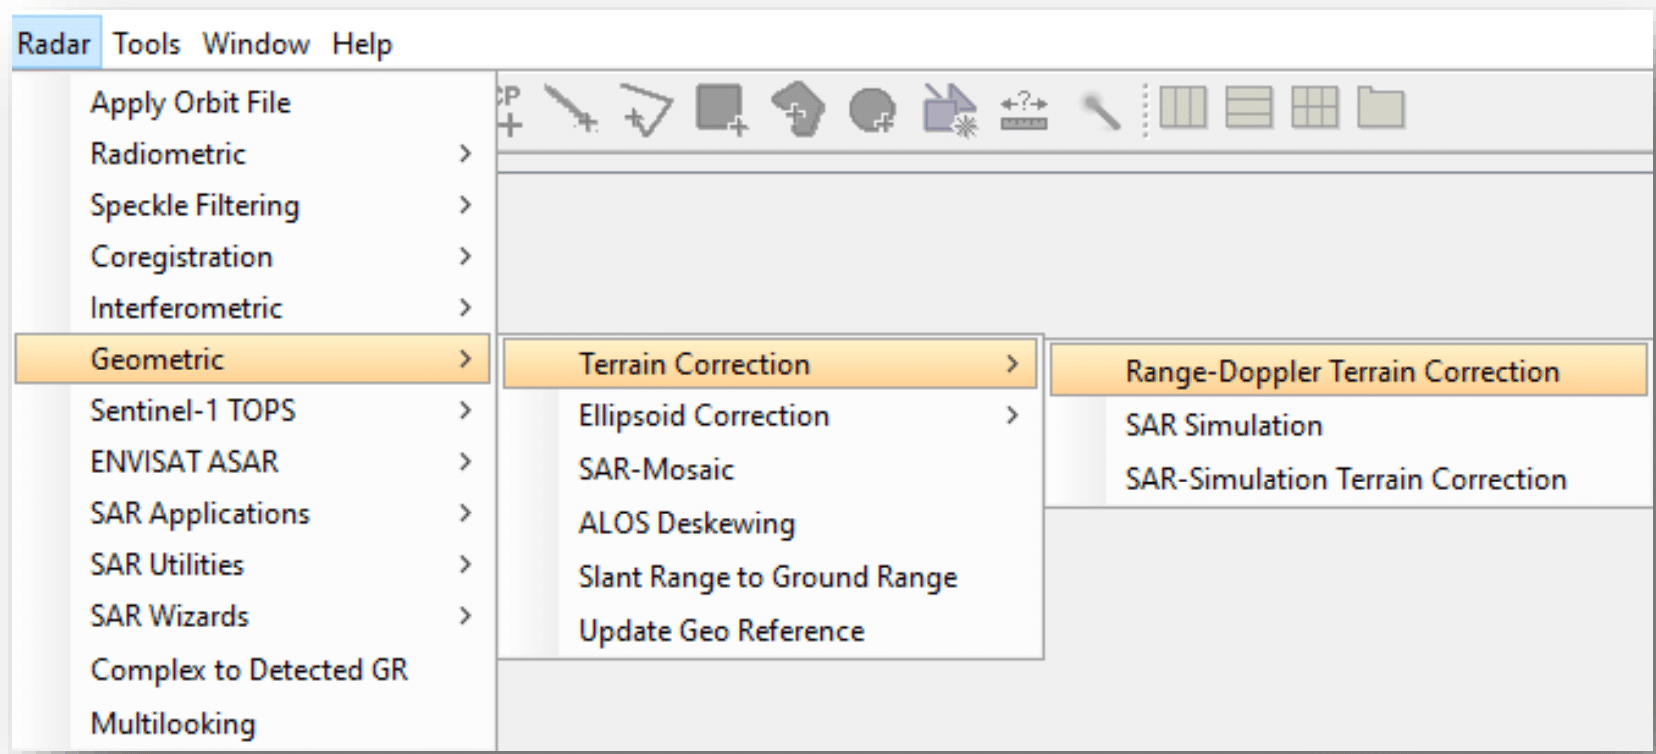
- Navigate to Radar > Geometric > Terrain Correction > Range-Doppler Terrain Correction
- In the Range-Doppler Terrain Correction window, select the Unwrapped Phase product you just imported from SNAPHU.
- If you did not check the option to NOT save the wrapped interferogram in the previous step, all of the bands will be present in the list of Source Bands in the Processing Parameters tab. Use Ctrl to highlight the bands you would like to terrain-correct.
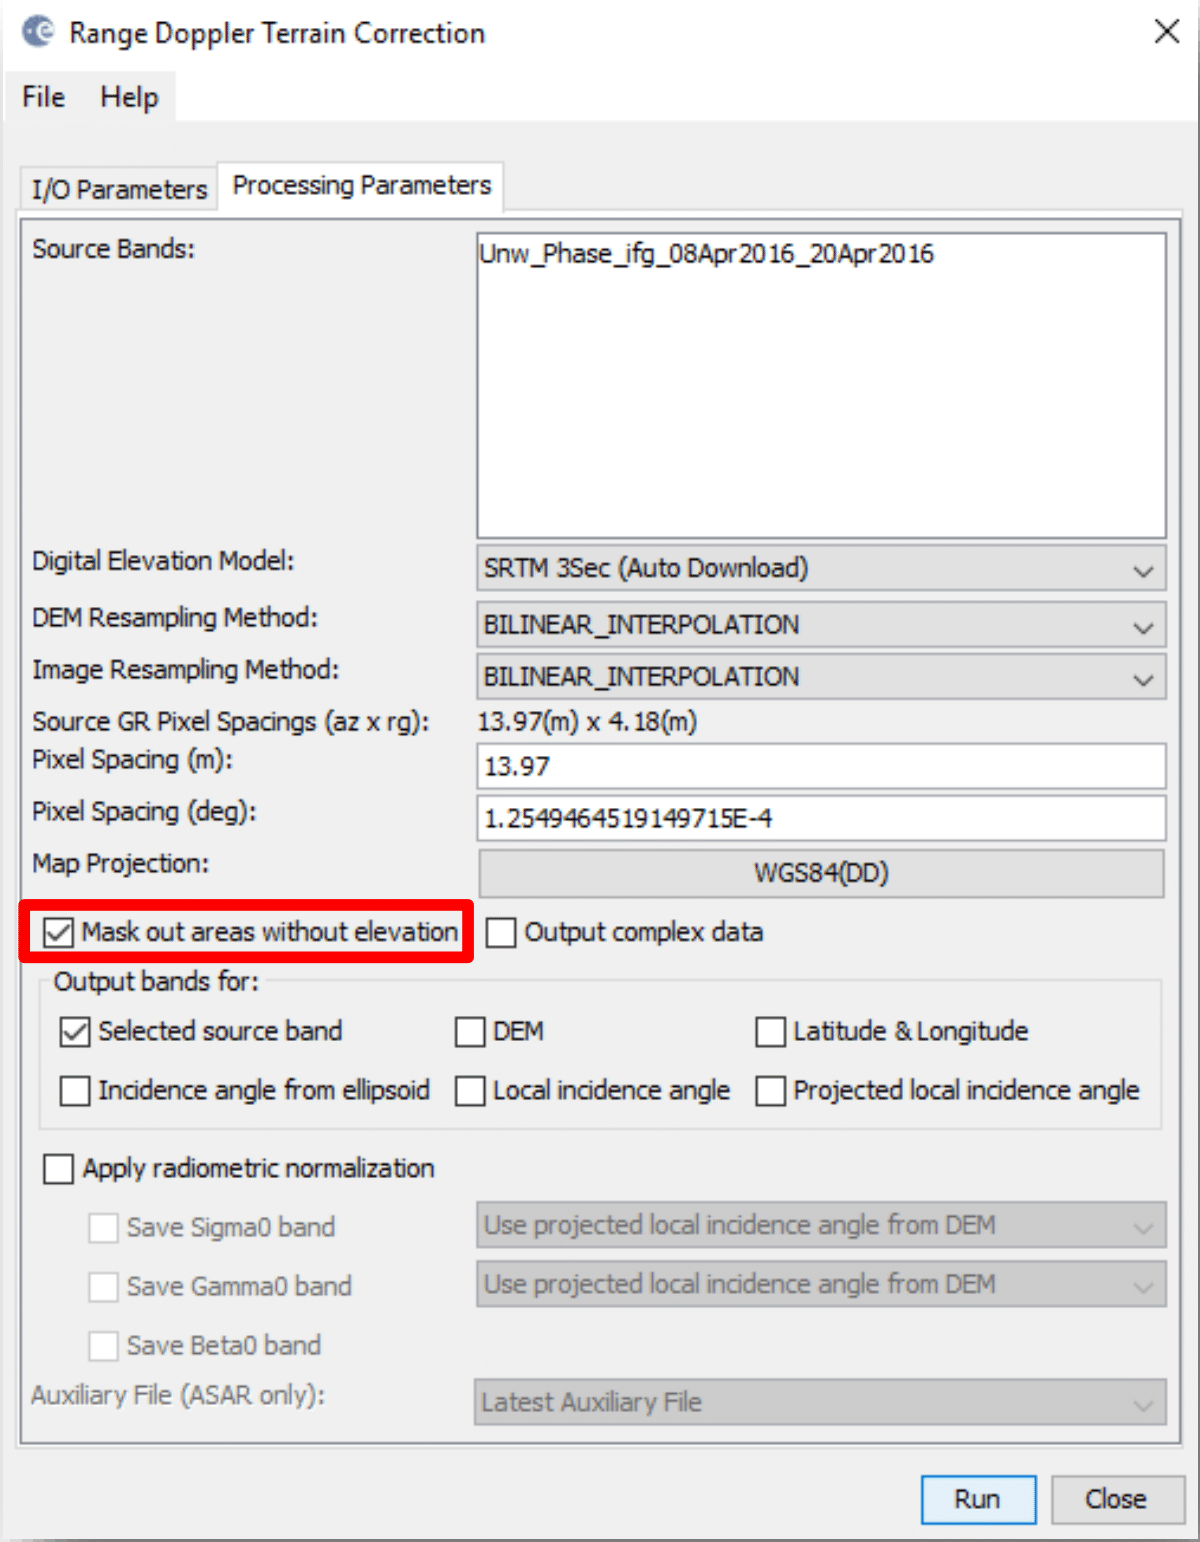
- In the Processing Parameters tab:
- Select the option to Mask out areas without elevation, if desired.
- Change pixel spacing, if desired
- Leave all other parameters as default settings
- Click Run to geocode your data
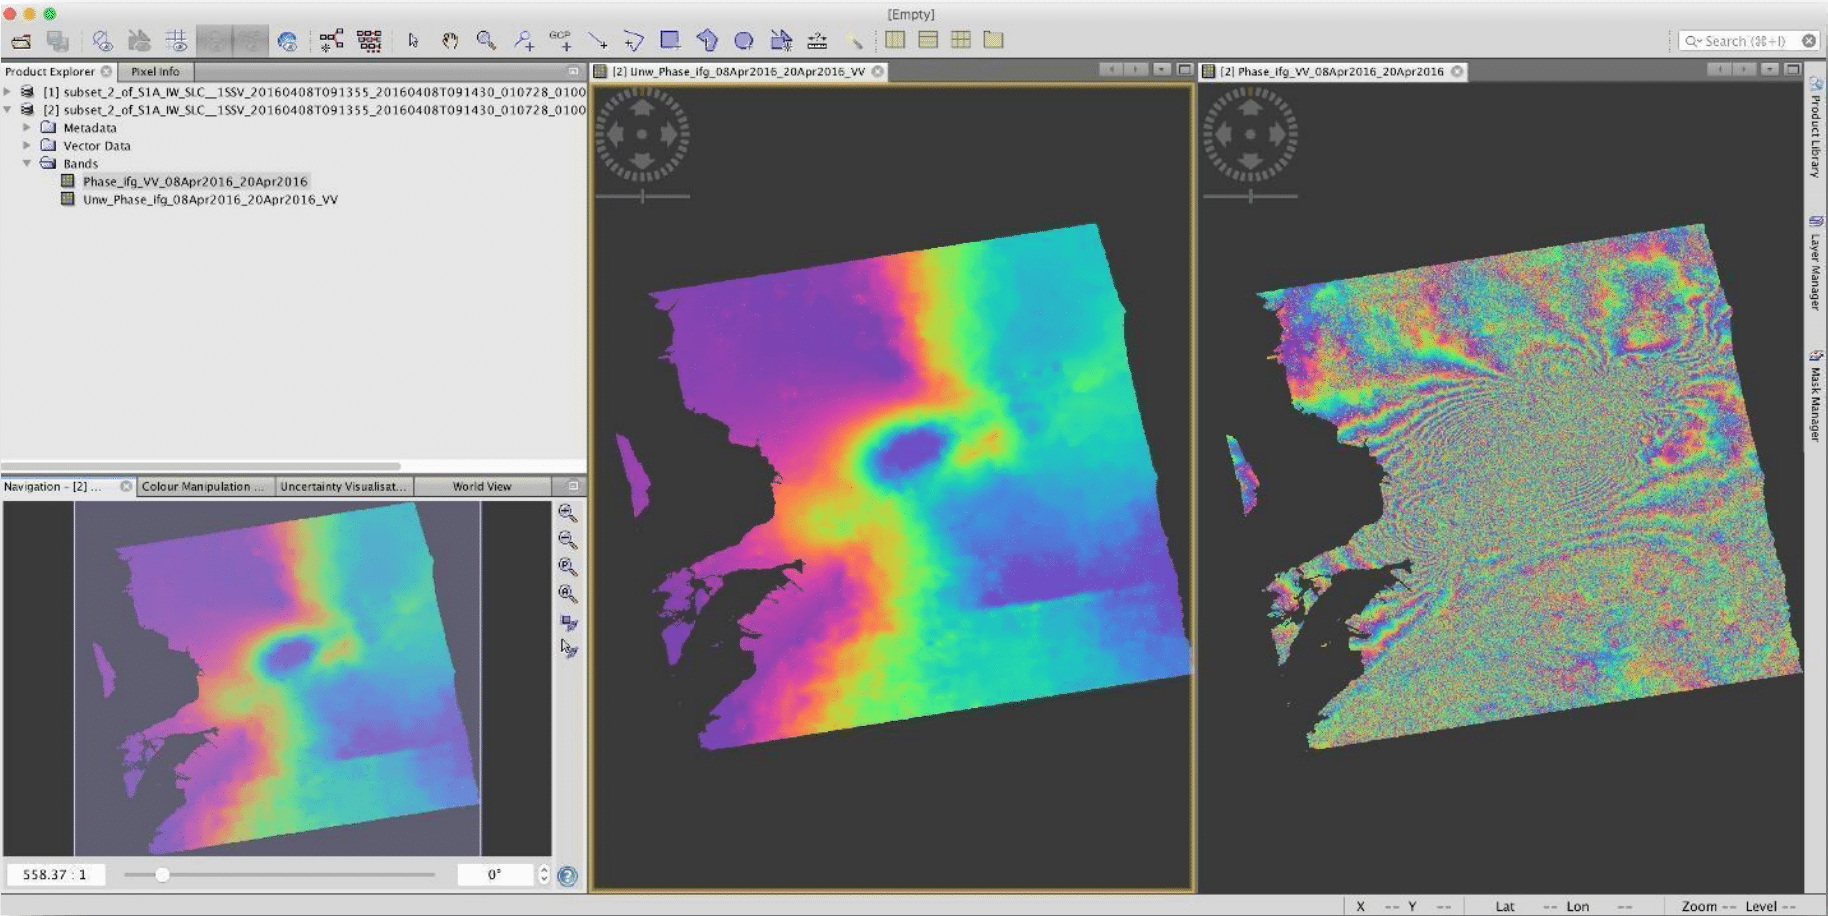
The resulting product name is appended with _TC. It will include all selected bands. See “Geocoded Wrapped and Unwrapped Phase” image for the resulting geocoded wrapped and unwrapped interferograms.
Export Data
The final geocoded data can be exported from Sentinel-1 Toolbox in a variety of formats.
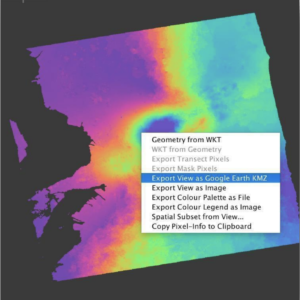
To export, you may either right-click on your product in the product view or navigate to File > Export
In addition to GeoTIFF and HDF5 formats, KMZ and various specialty formats are supported. The Kumamoto image shows a KMZ-formatted unwrapped interferogram in Google Earth.
Interferogram Interpretation
The interferometric phase carries a wealth of information about surface deformation (strength and direction of motion) and the location of the surface rupture. The phase map is also a proxy for other earthquake-related parameters such as the energy released during an event and the amount of shaking experienced across the affected area.
Unwrapped results should be interpreted as a relative height/displacement between two pixels. To obtain absolute estimates, a tie point can be used in the unwrapped phase to height operation.


