
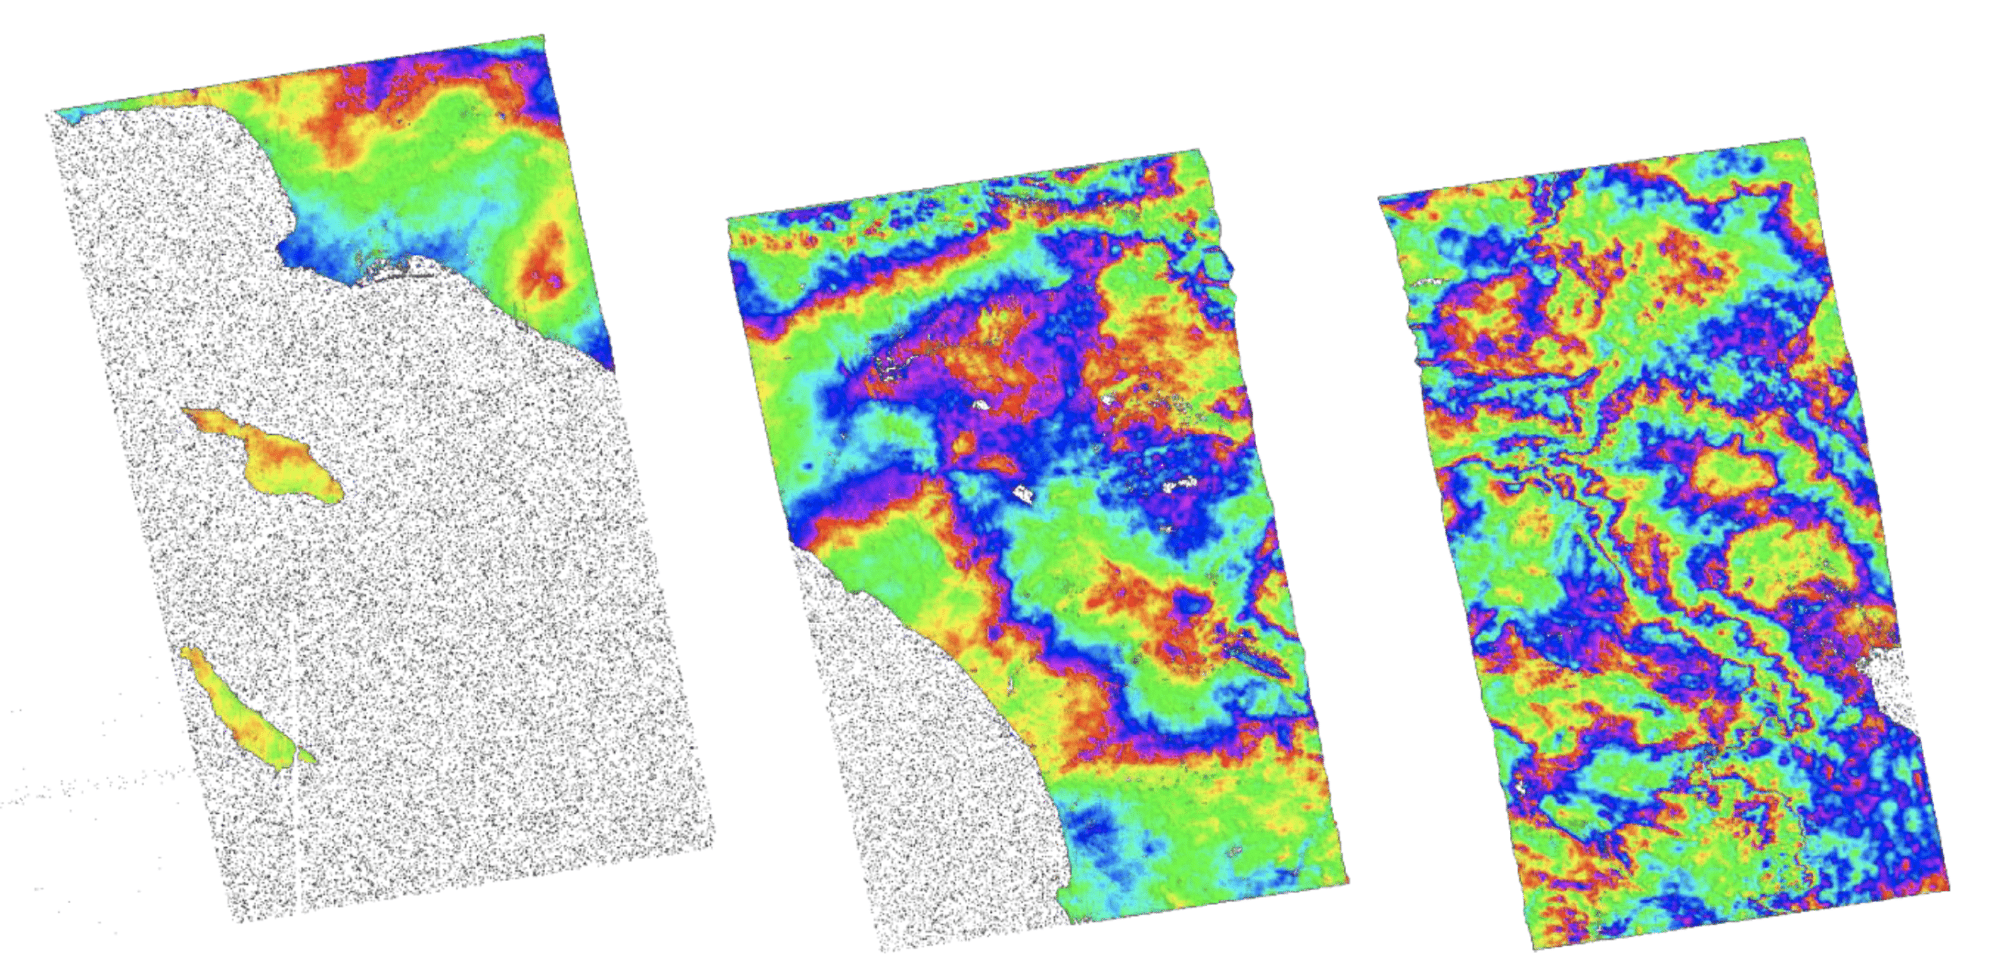
Script output images: color phase products for each swath F1, F2, F3. Contains modified Copernicus Sentinel data (2015) processed by ESA.
Adapted from instructions prepared by ASF
● Easy (AWS sign-up and configuration)
Background
After logging-in the user must make some choices before creating their InSAR products. These steps guide you through that process, with recommended settings.
Steps
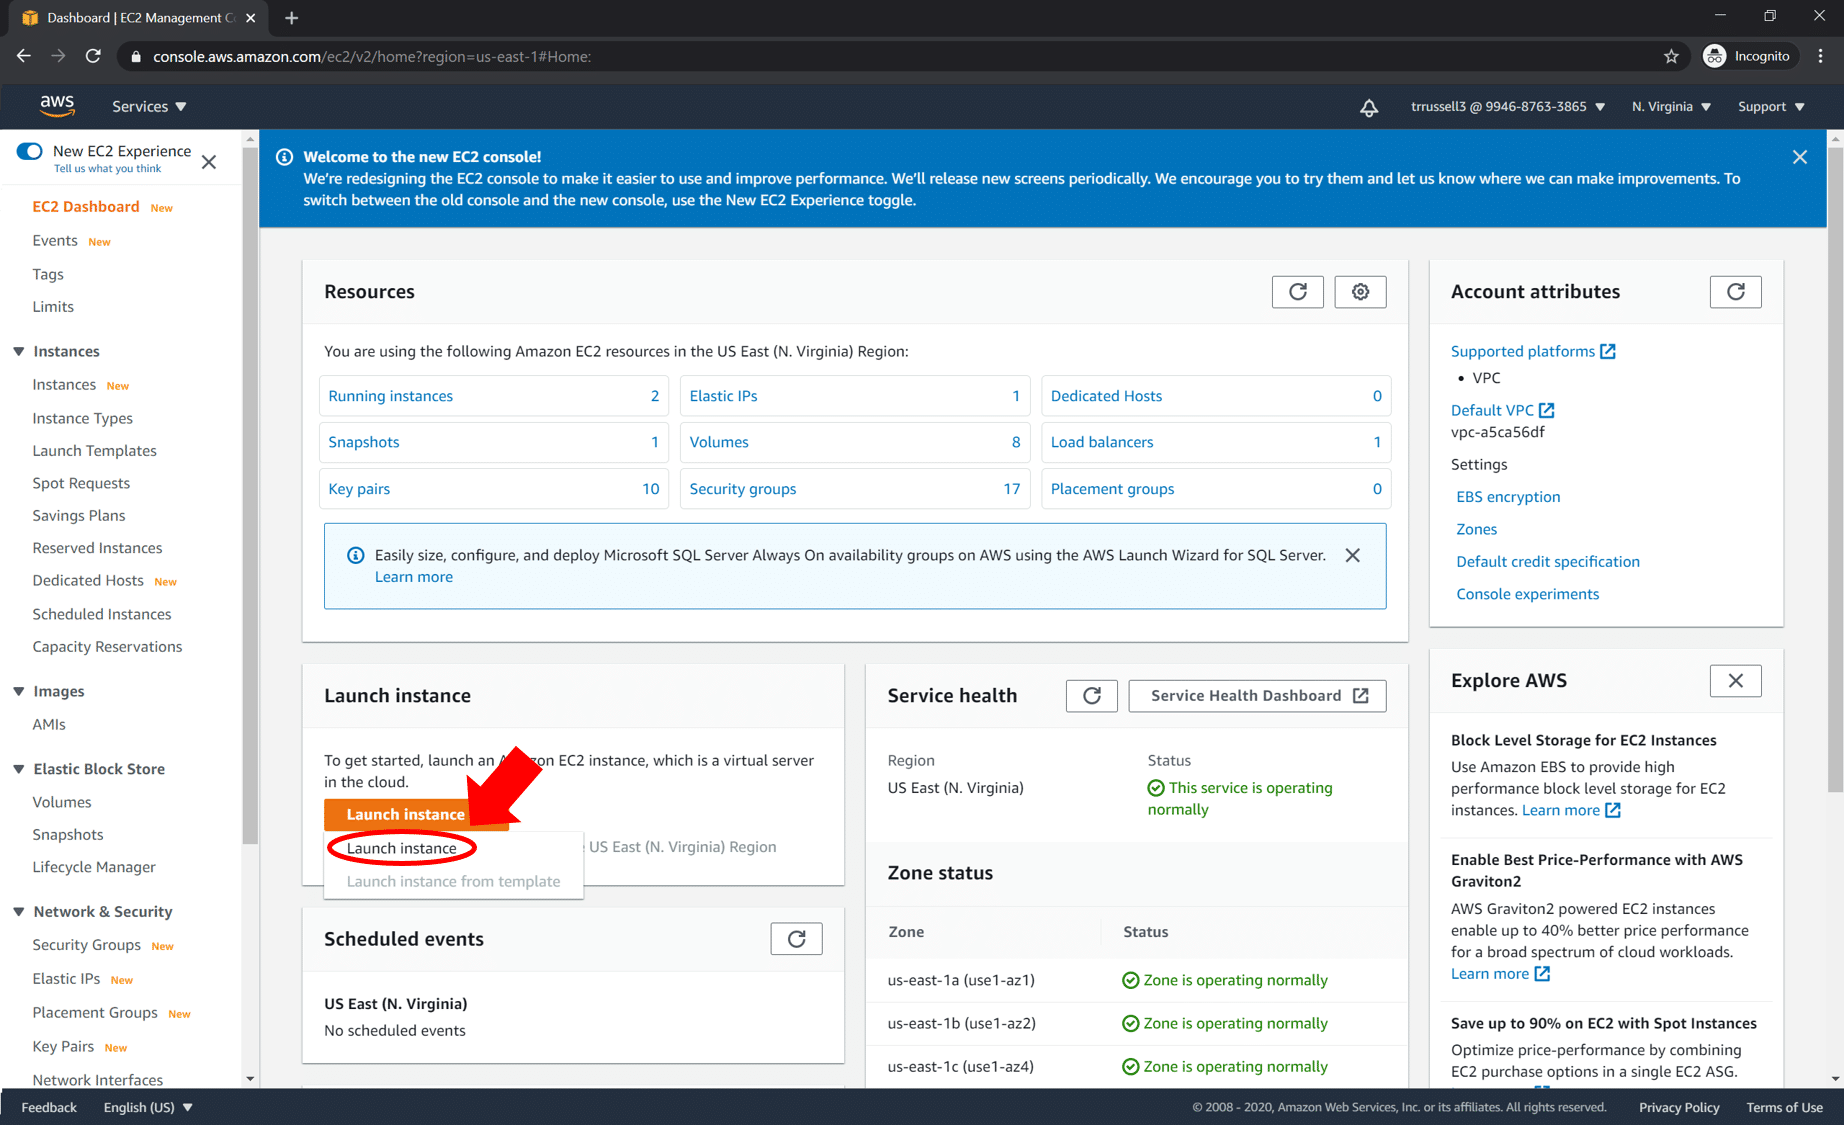
Start an EC2 Instance
- Sign in to your AWS account, or create one now.

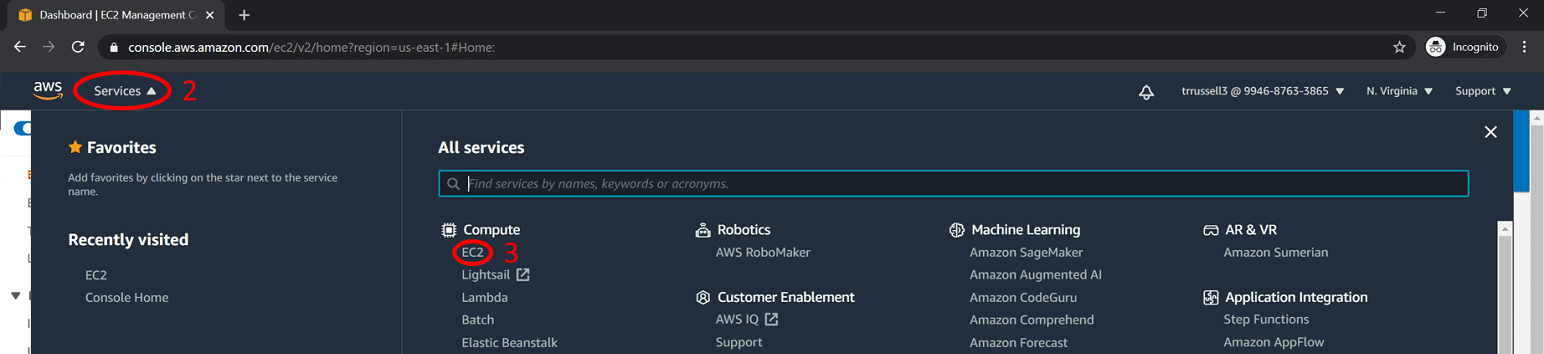
- Click on the Services drop down on the top left
- Under Compute, click on EC2.
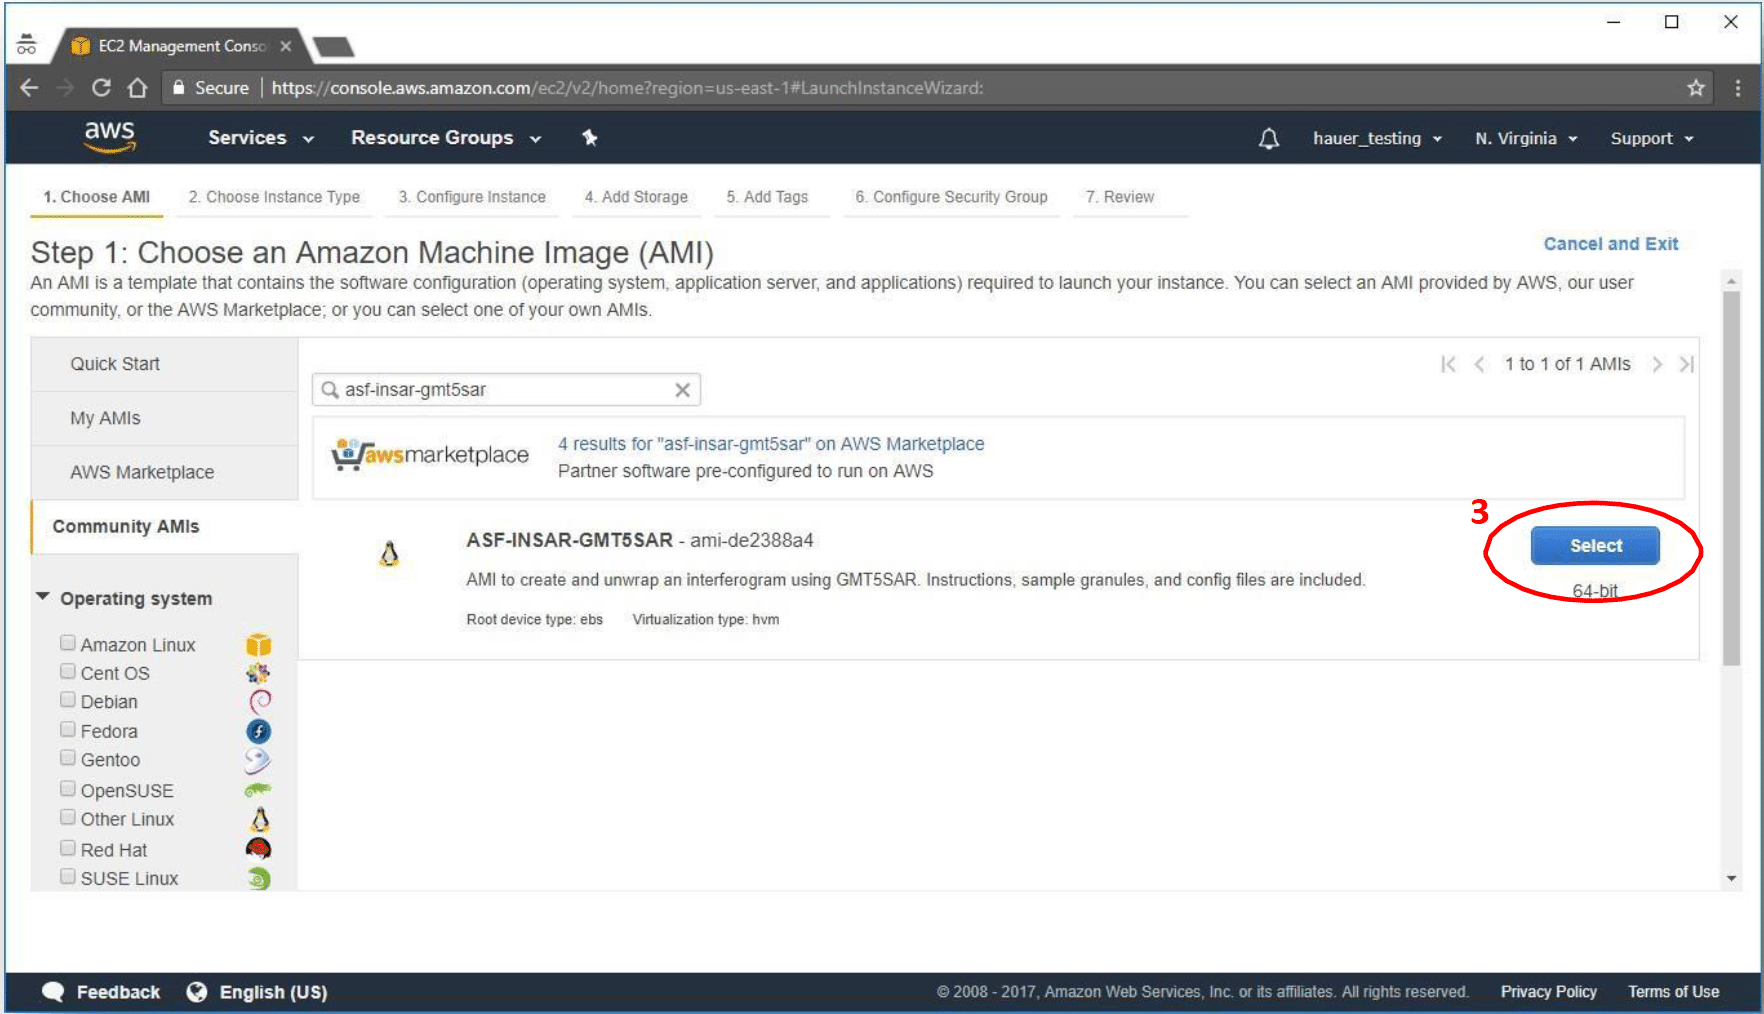
Select an Amazon Machine Image (AMI) — i.e., the software package you want
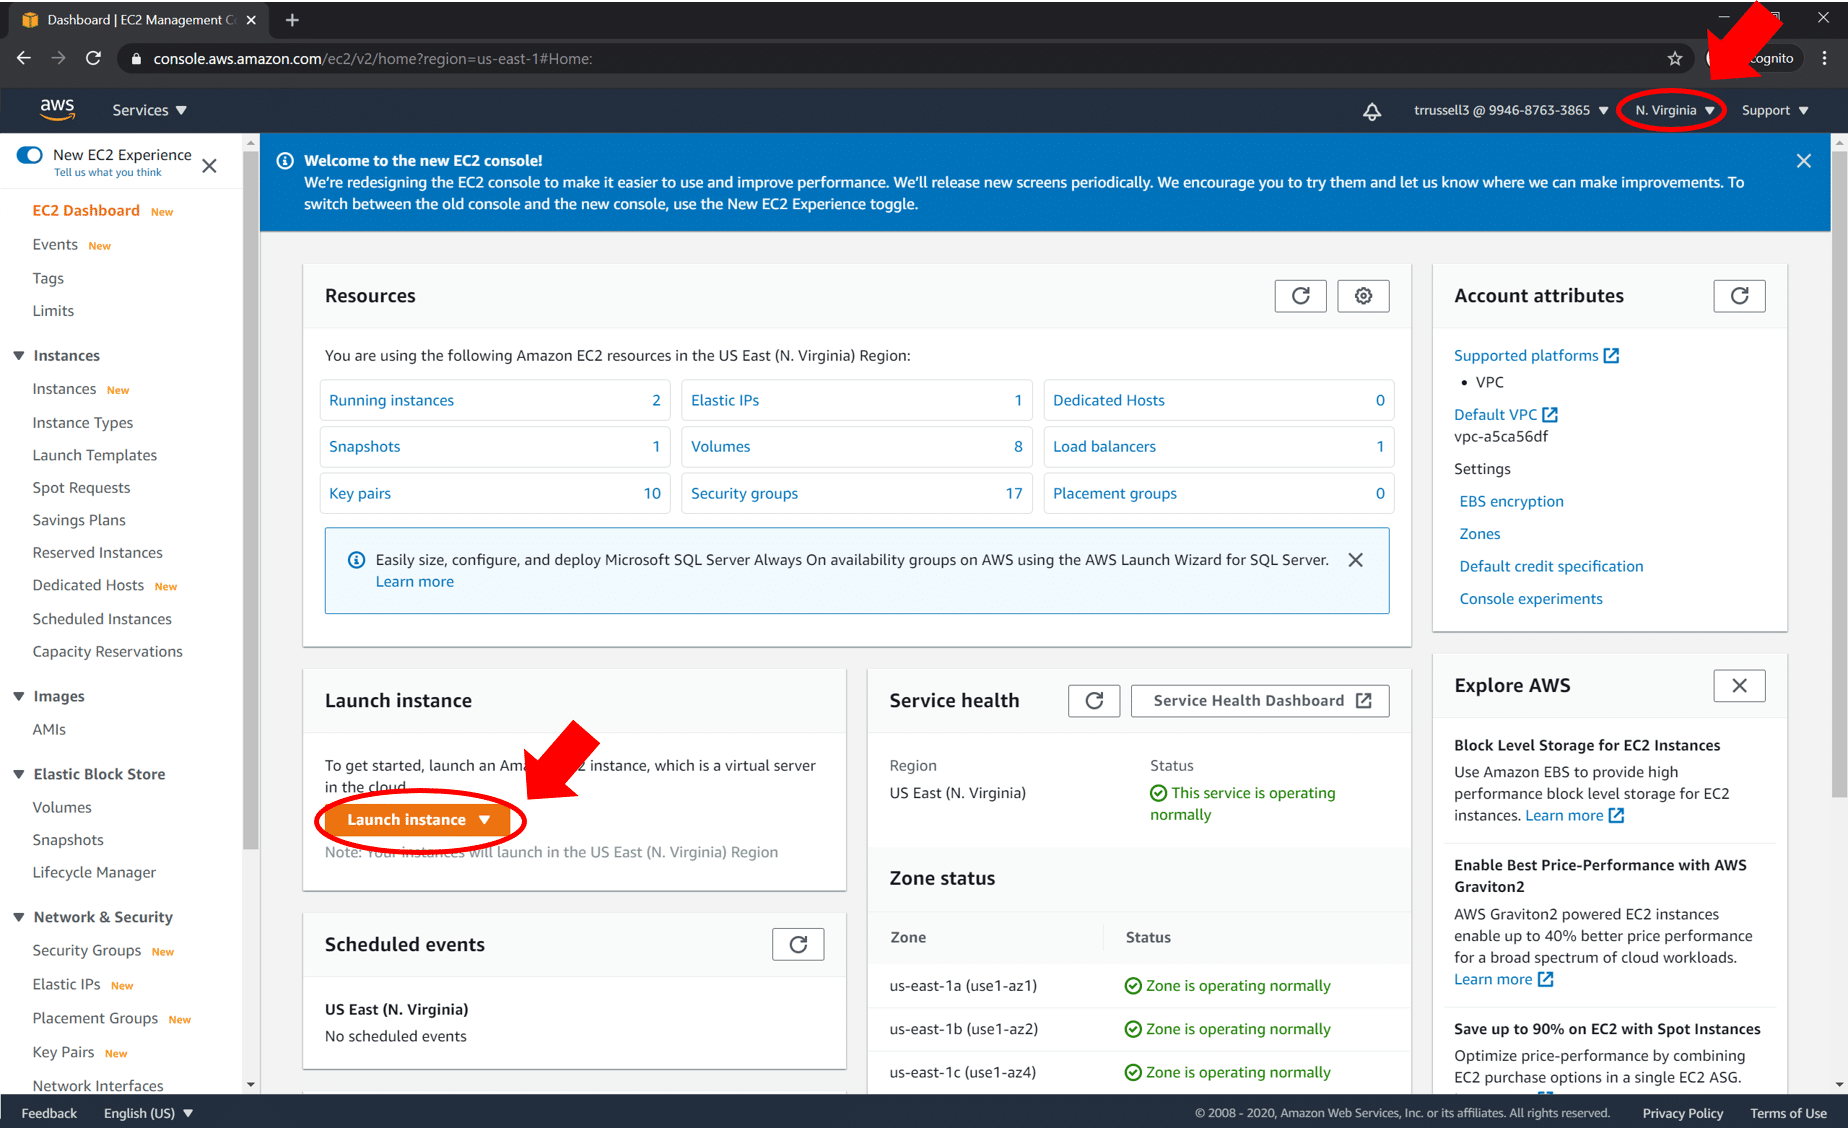
- At the right on the top menu bar, set the Region to US East (N. Virginia) by selecting from the drop-down menu.
- Click on the Launch Instance button.
- Click on Launch Instance.
- Choose an Amazon Machine Instance (AMI) — Step 1
- (1) Under Quick Start, click on Community AMIs.
- (2) In the Search community AMIs box, type “asf-insar-gmt5sar” and press Enter.
- (3) Click the Select button next to ASF-INSAR-GMT5SAR
- Choose an Amazon Machine Instance (AMI) — Step 1

Configure the EC2 Resources
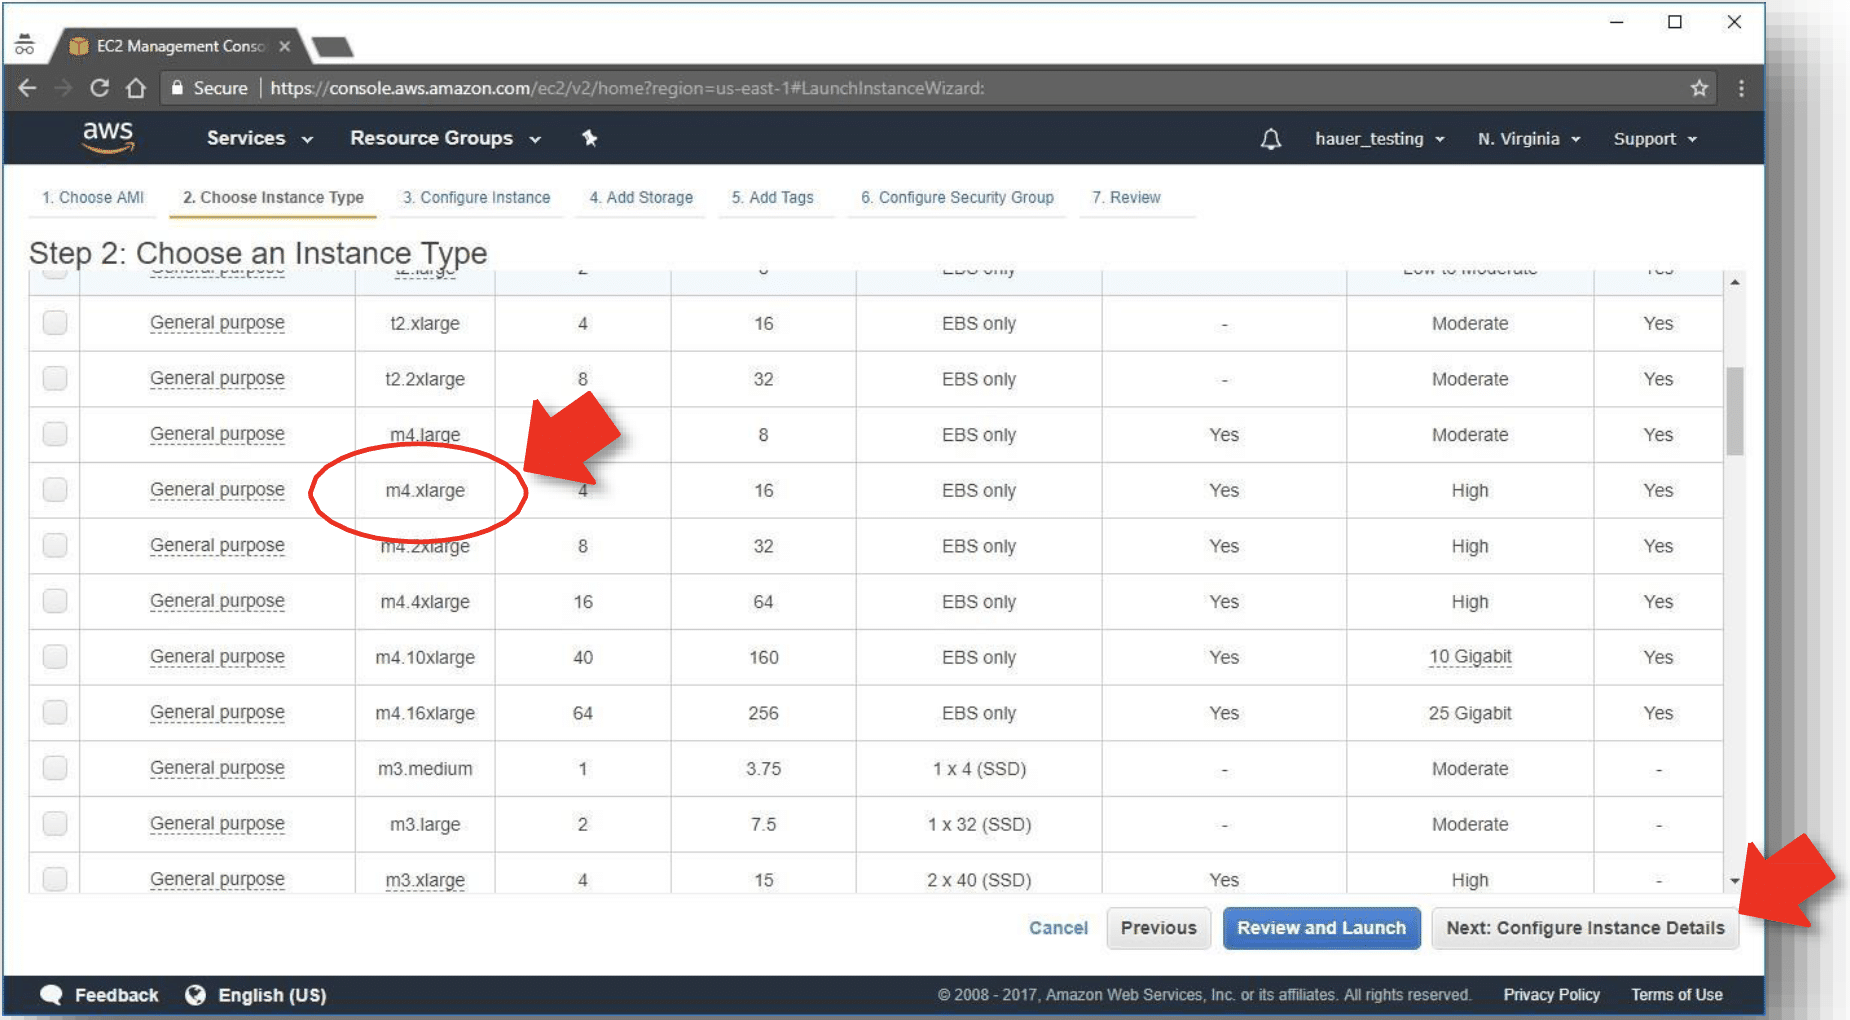
- Choose an Instance Type — Step 2
- Scroll down the table of available instances and choose: m4.xlarge.
- Then click on the Next: Configure Instance Details button.
- Scroll down the table of available instances and choose: m4.xlarge.
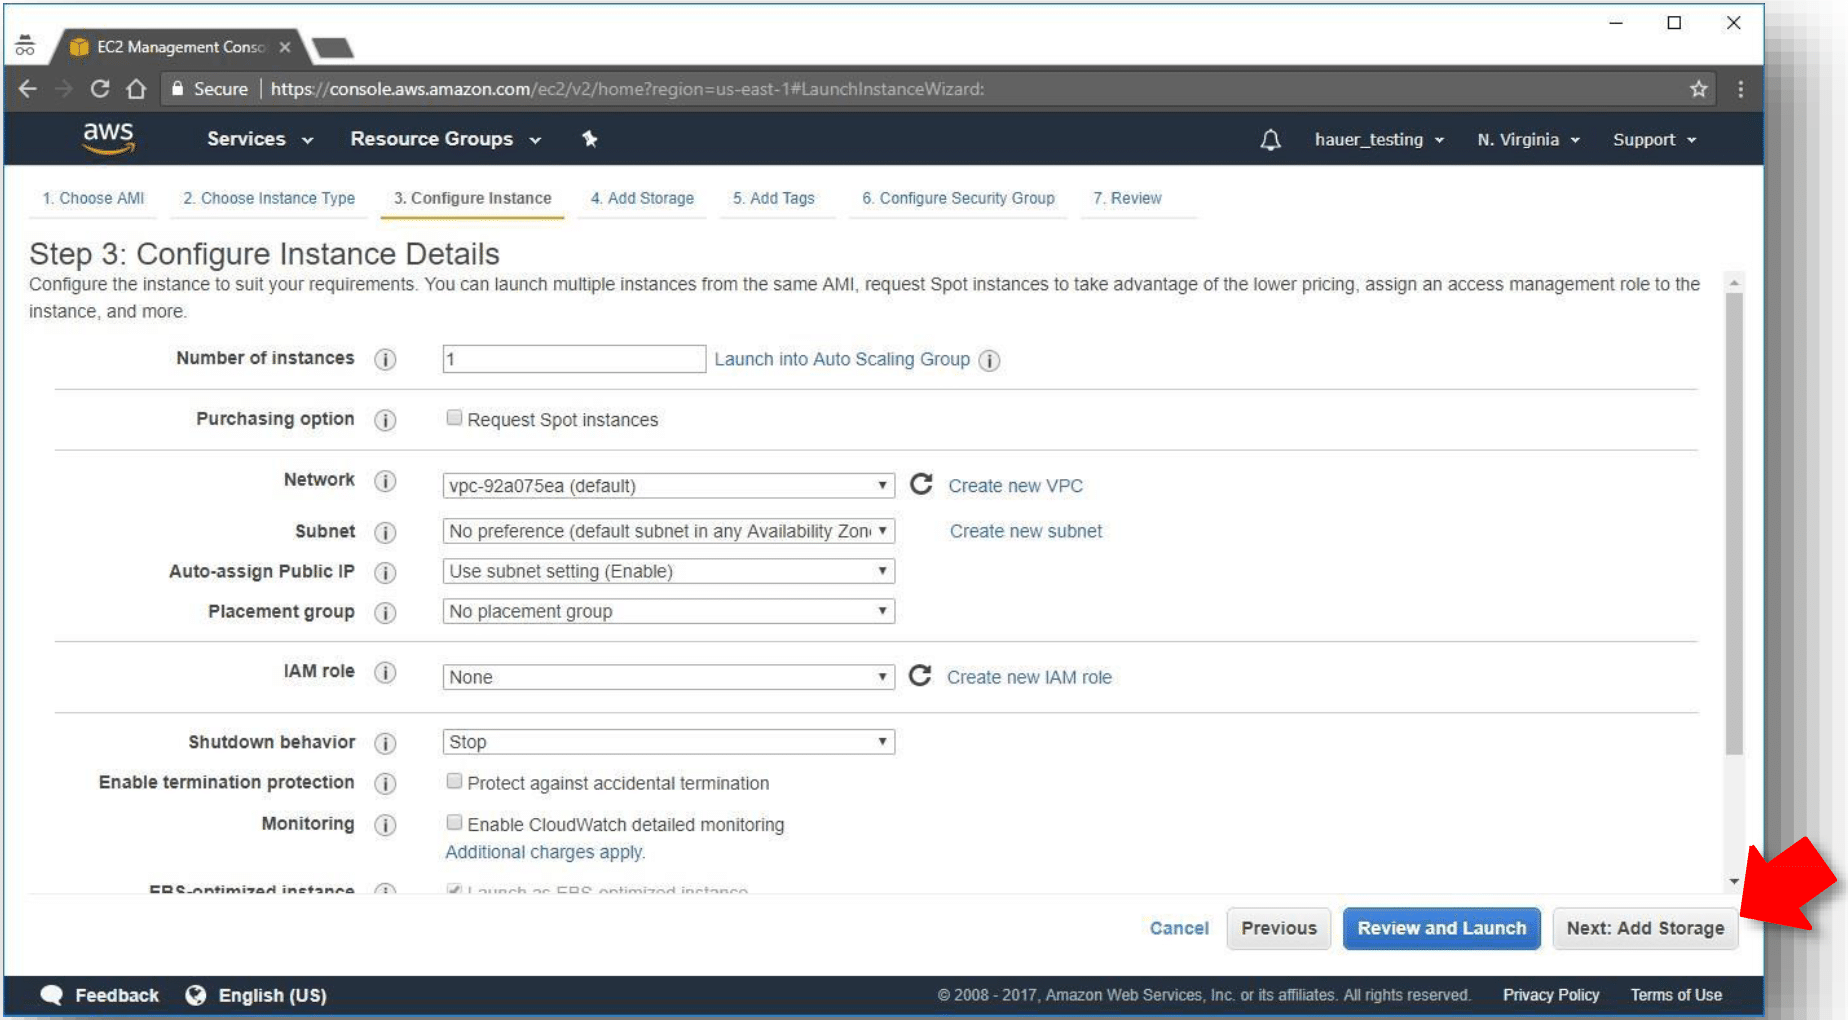
- Configure Instance Details — Step 3
- Nothing needs to be changed here, so click on the Next: Add Storage button.
- Choose an Instance Type — Step 2
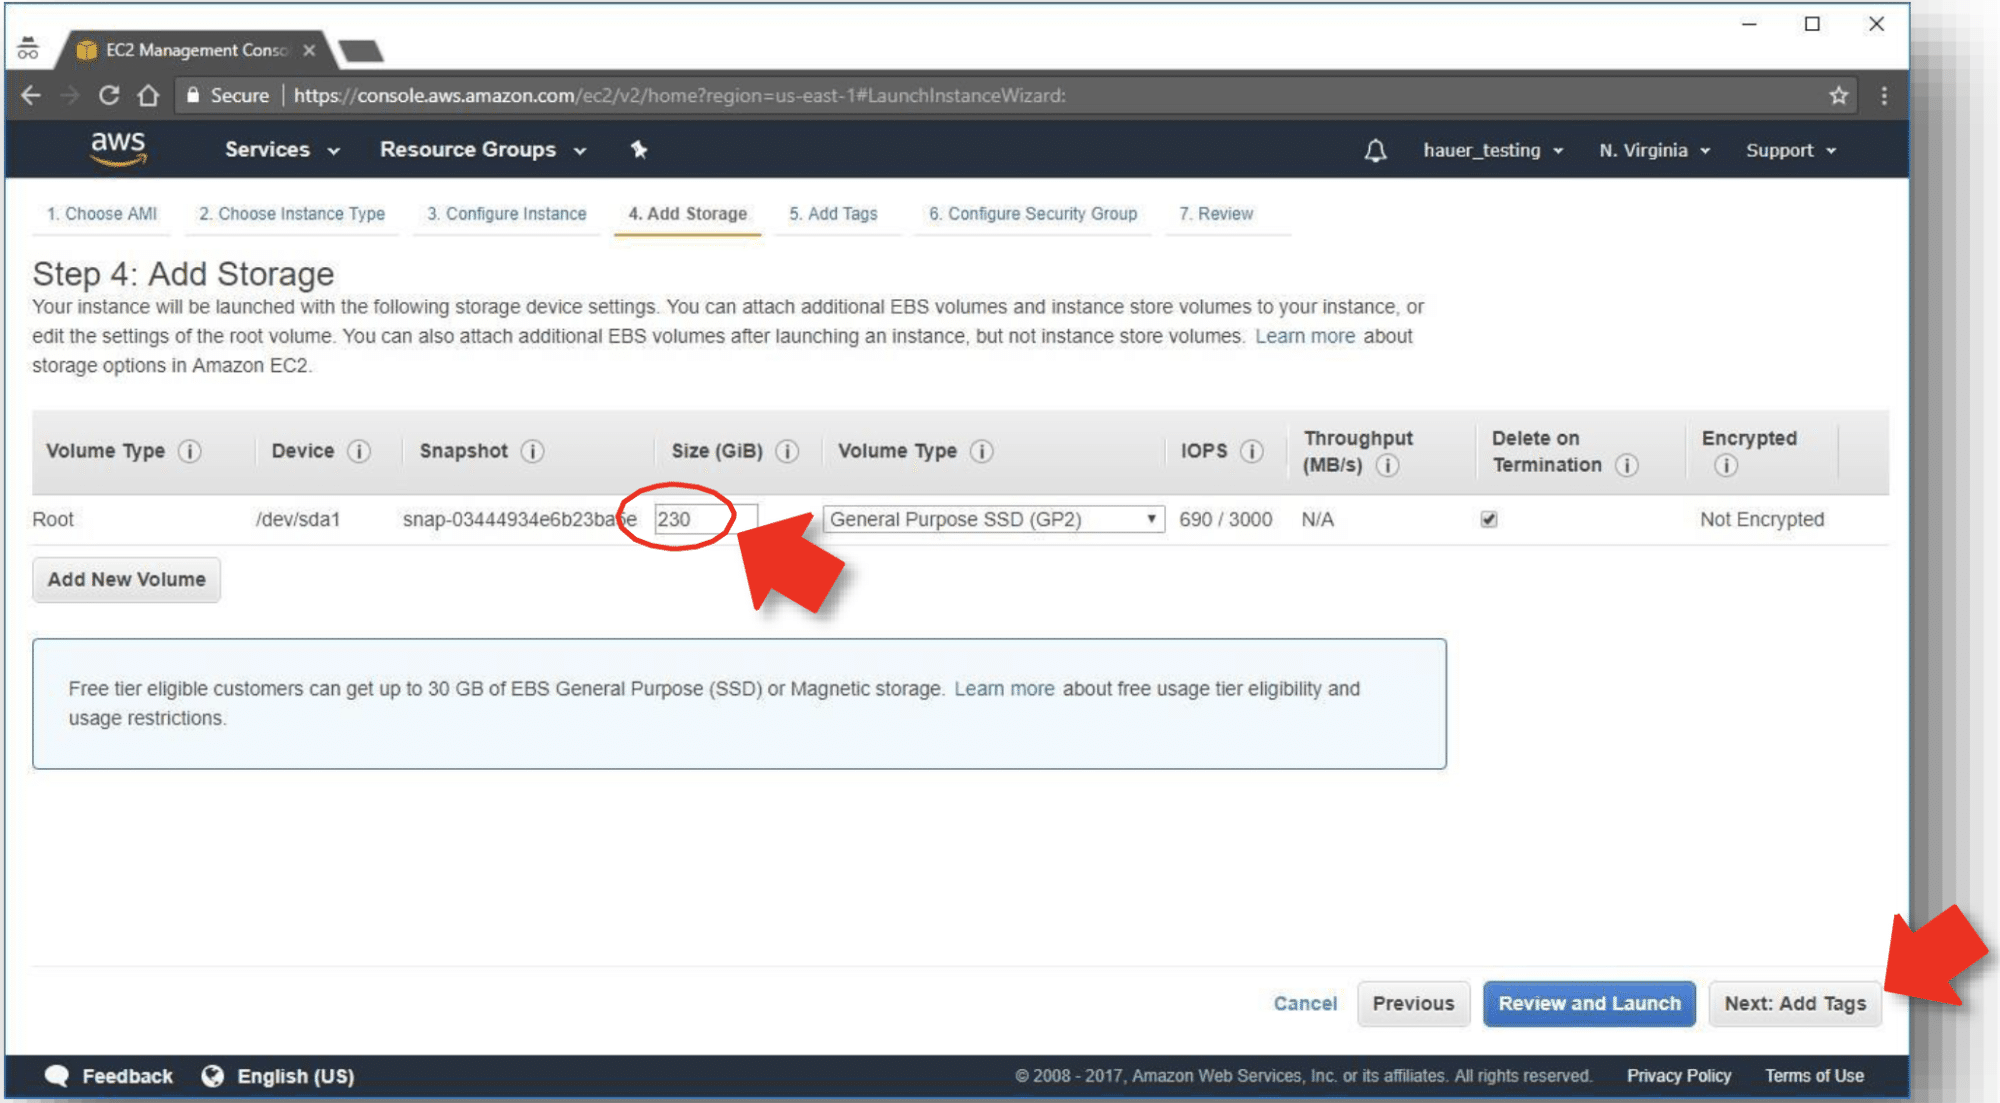
- Add Storage — Step 4
- The volume storage size is preset, so confirm that the Size (GiB) value is 230 and then click on the Next: Add Tags button.
- Add Storage — Step 4
- Add Tags — Step 5
- (1) Click on the Add Tag button.
- (2) Under Key, type “Name.”
- (3) Under Value, type a description; for example, “asf-insar-tutorial.”
- Click on the Next: Configure Security Group button.
- Add Tags — Step 5


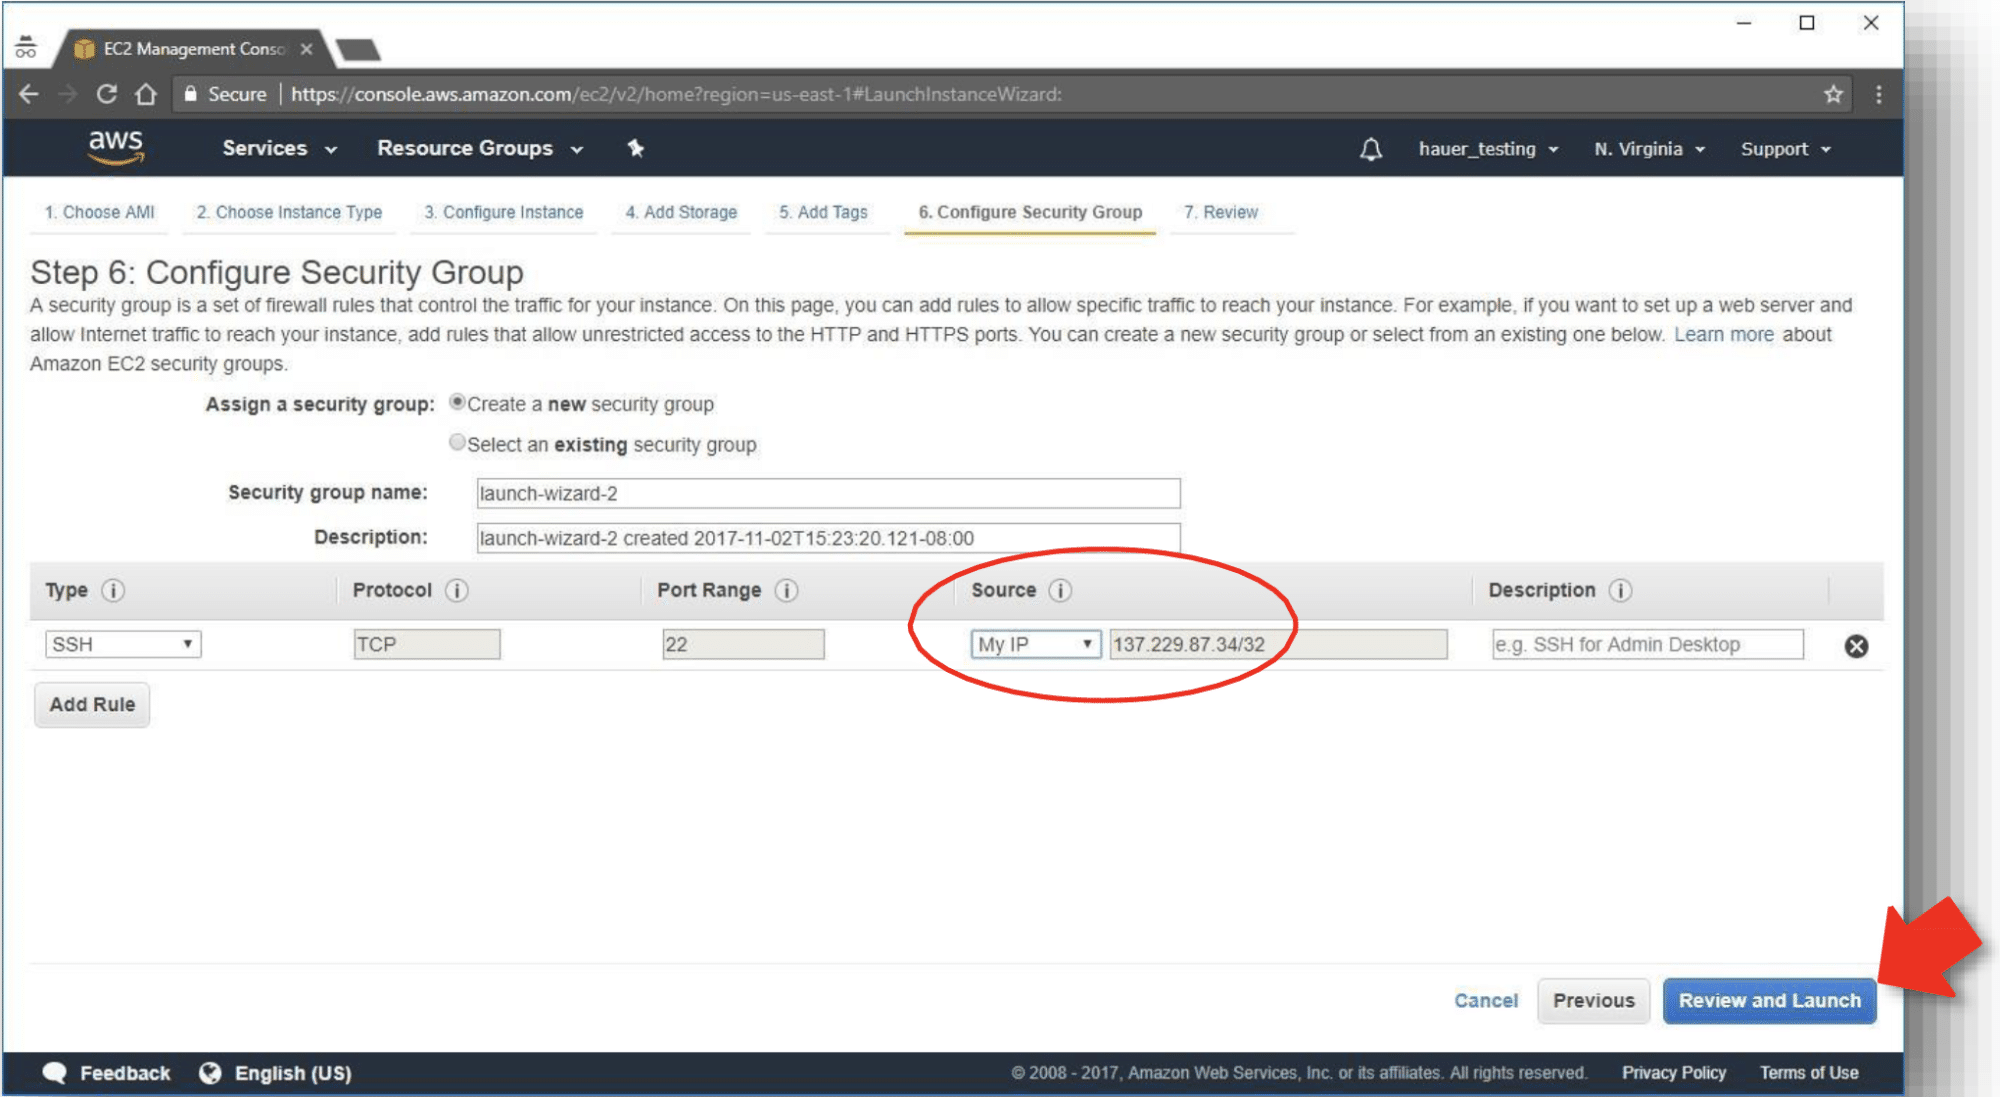
- Configure Security Group — Step 6
- This step allows you to set access permissions for your instance. We will create a setting so that only your computer can access your instance.
- In the Security group name box, type a name.
- Under Source, click on Custom and select and click on My IP.
- The IP address of your computer is automatically selected.
- Click on the Review and Launch button.
- Configure Security Group — Step 6

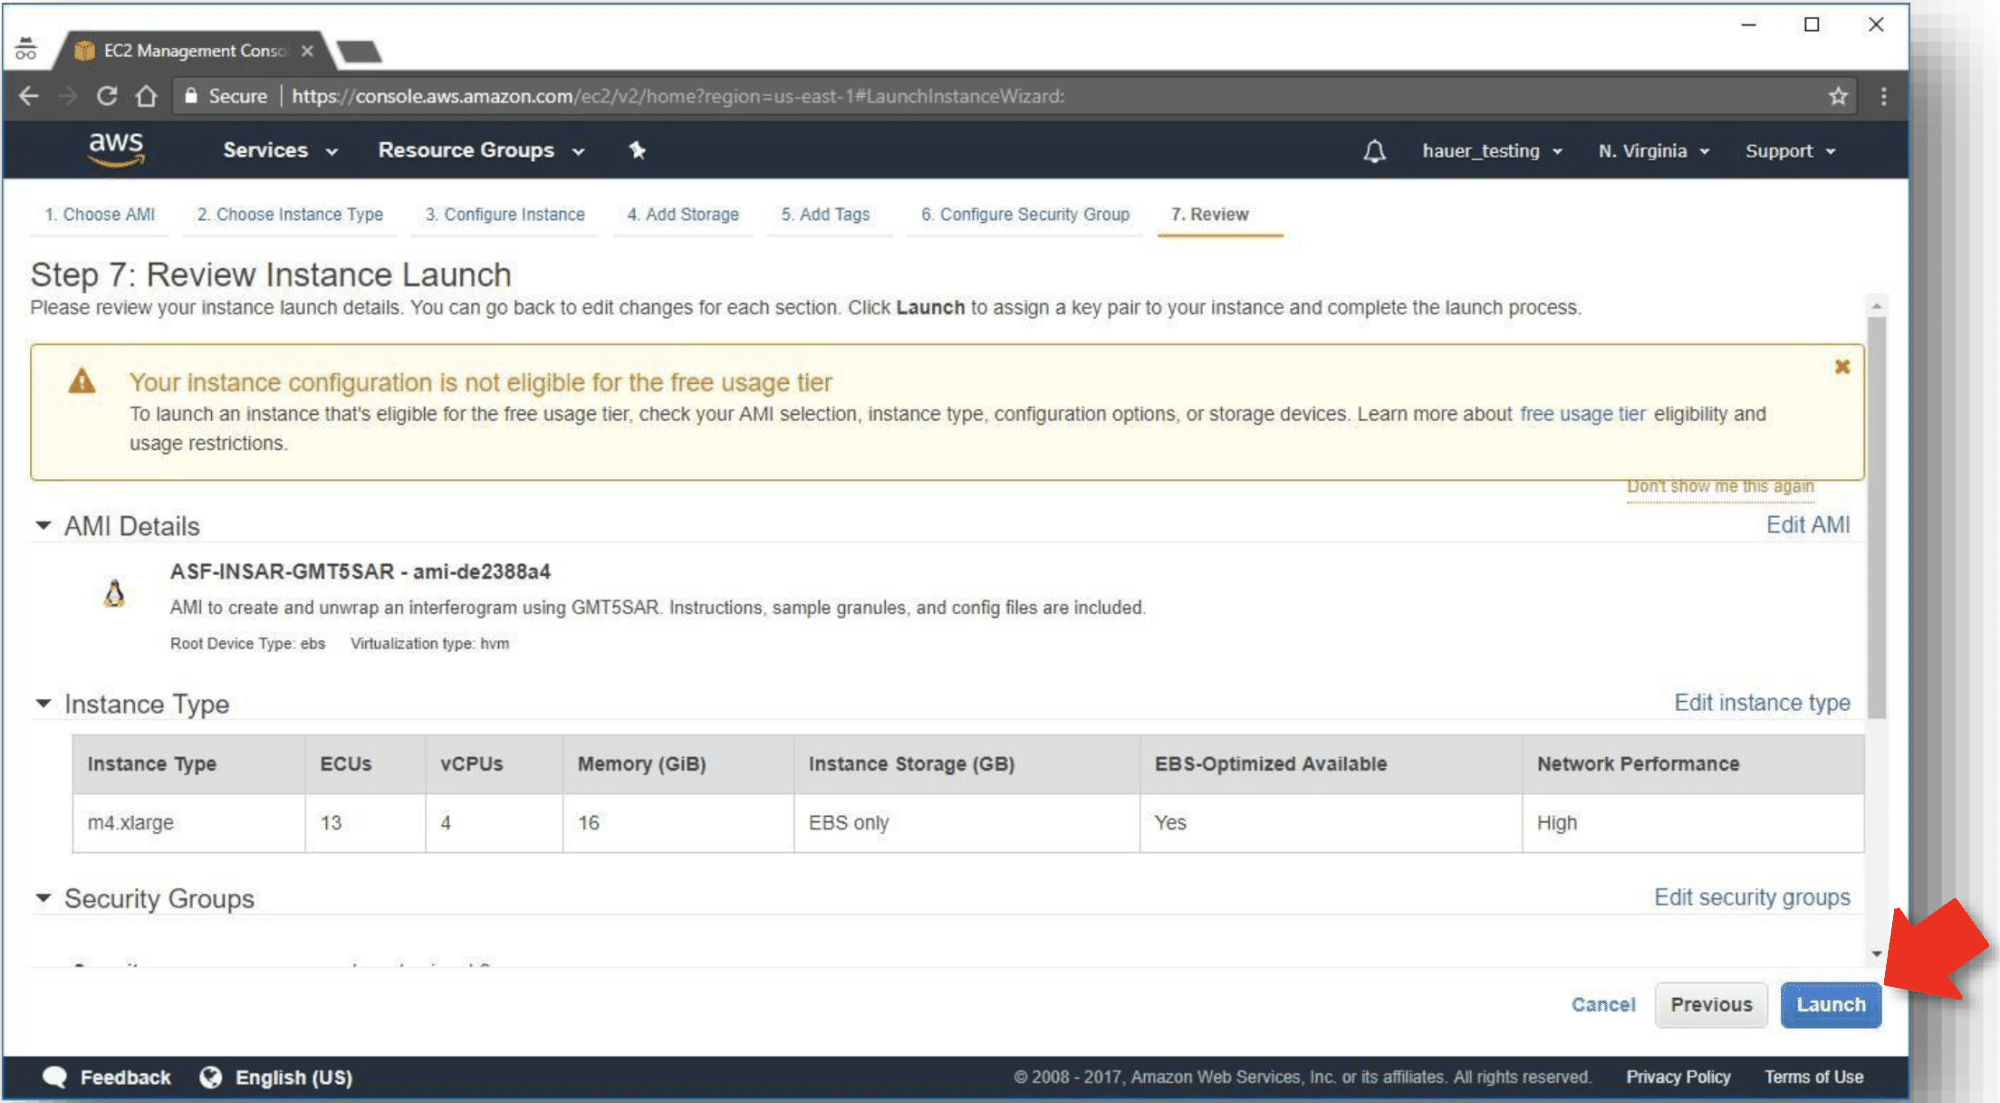
- Review Instance Launch — Step 7
- This last step allows you to review the details of your configuration before activating your new instance.
- A warning is displayed at the top of the screen that can be ignored. The “free usage tier” AMIs offered in AWS are not powerful enough to process the GMT5SAR InSAR recipe.
- Click on the Launch button.
- This last step allows you to review the details of your configuration before activating your new instance.
- Review Instance Launch — Step 7
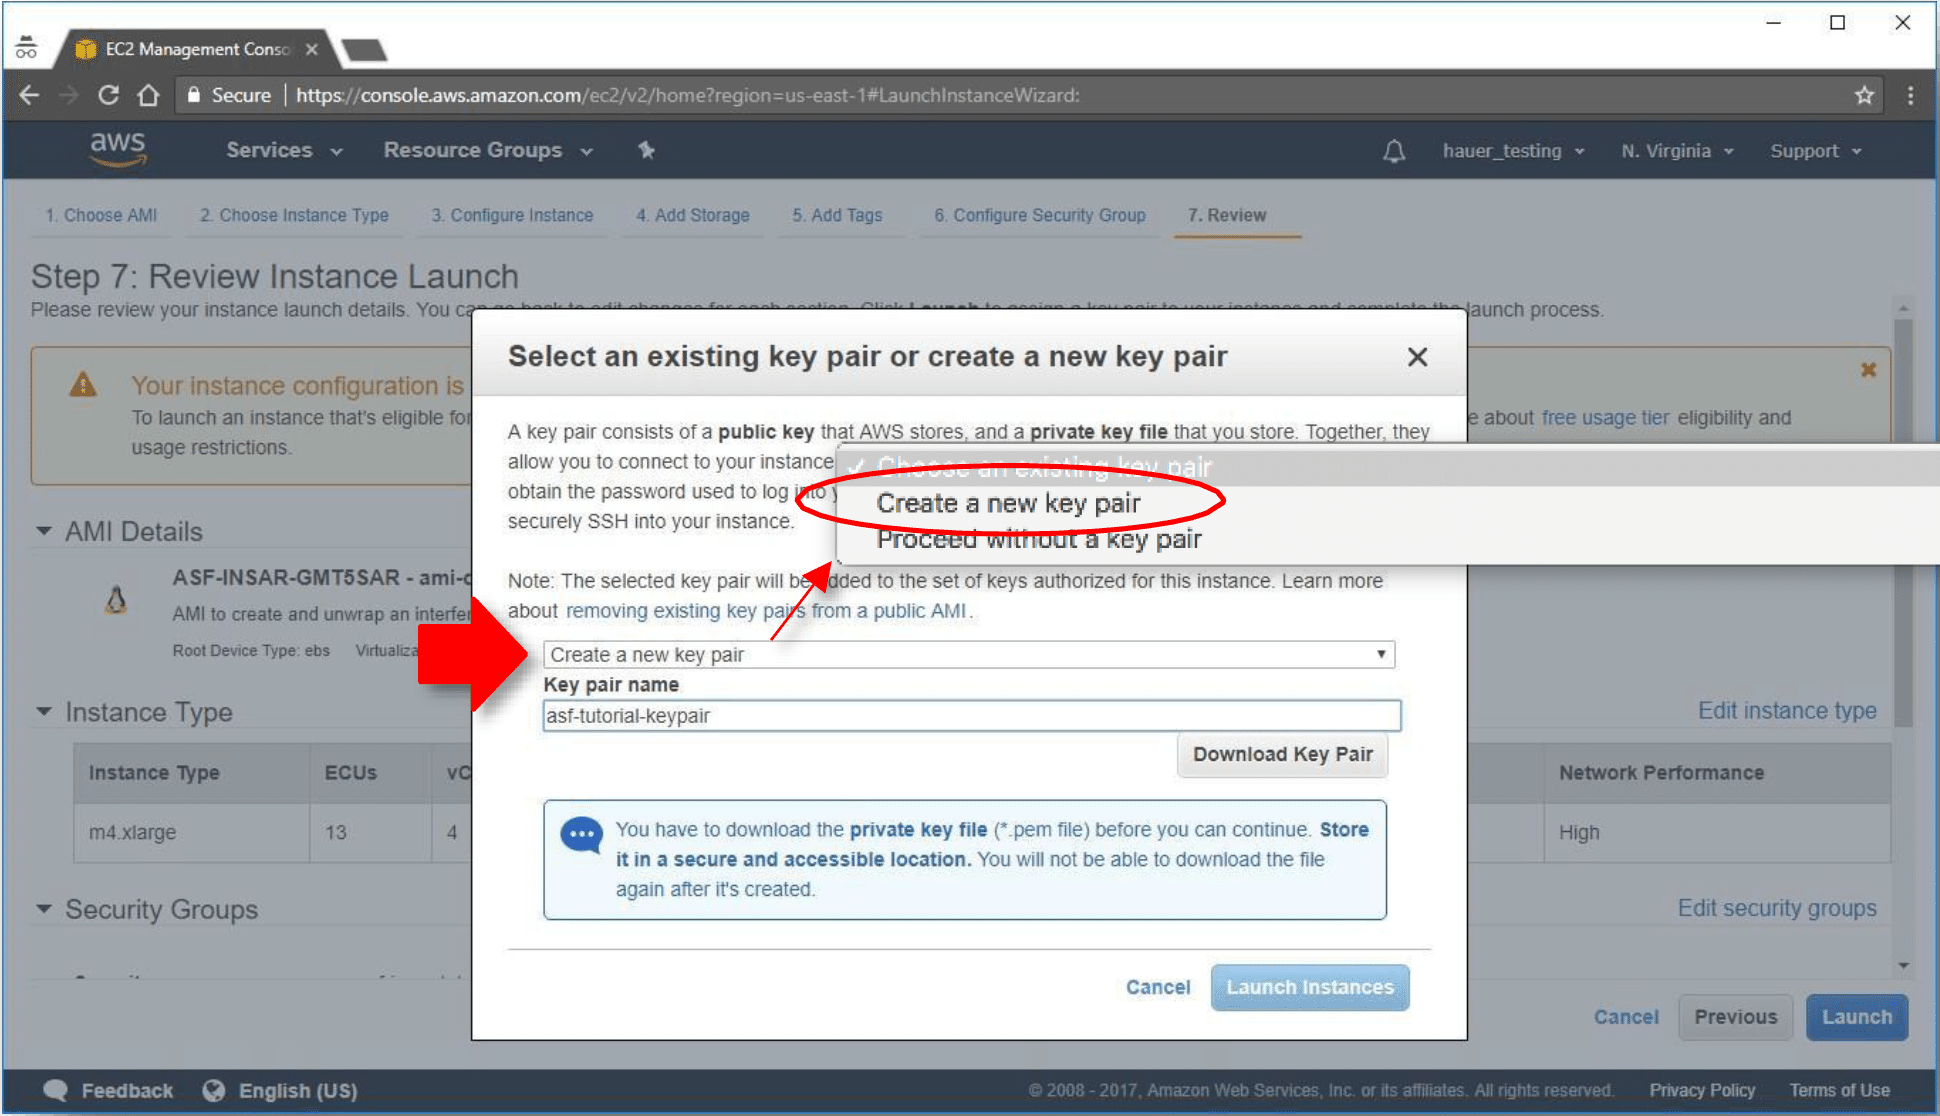
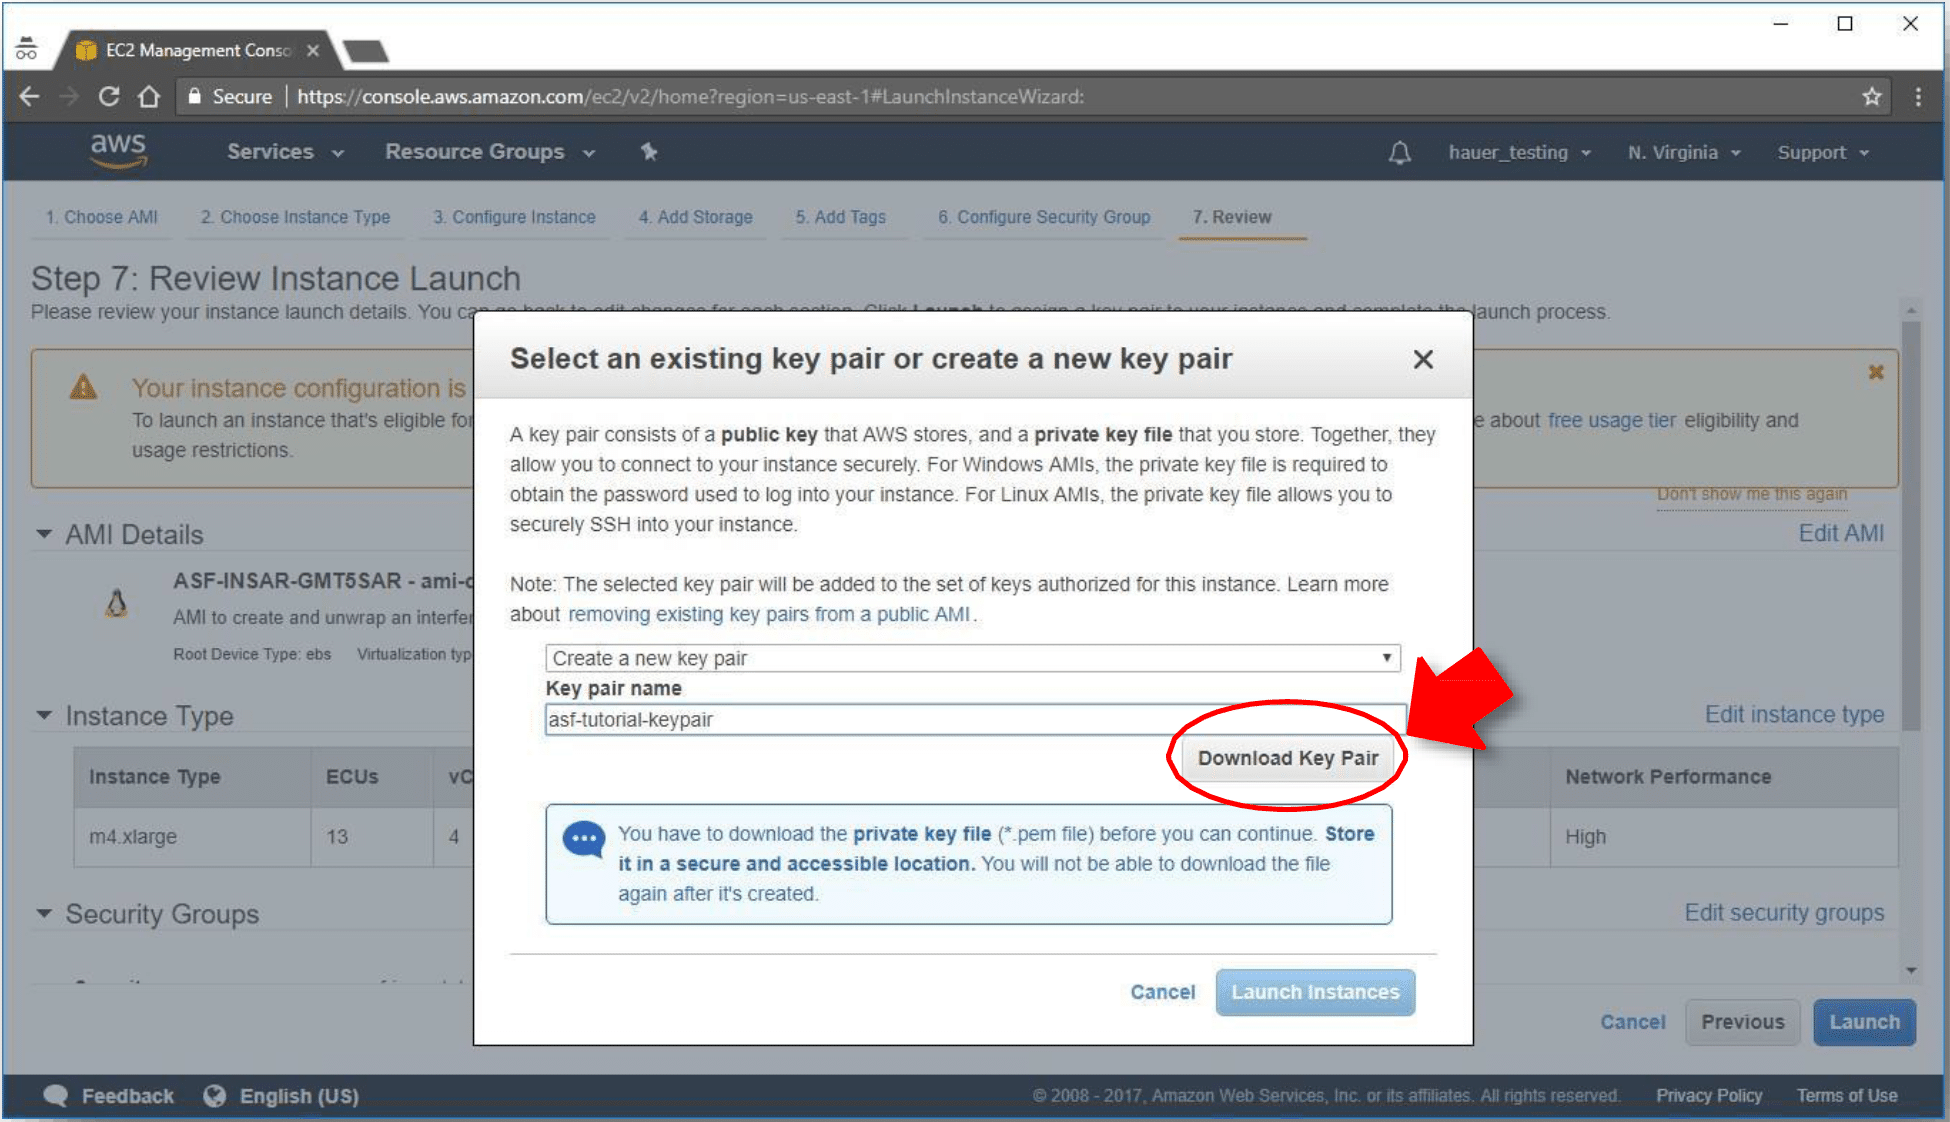
Create a Key Pair (.pem file)
- Create a key pair for authentication and encryption when connecting to your running EC2 Instance. Read more on information about key pairs.
- Click on Choose an existing key pair and select Create a new key pair.
- Name the key pair; for example, asf_tutorial_keypair.
- Click on the Download Key Pair button.
- Create a key pair for authentication and encryption when connecting to your running EC2 Instance. Read more on information about key pairs.
Note: The key pair file will download to your default Download directory as filename.pem and can be moved to a directory of your choice. The .pem file is required to connect to your EC2 Instance and to transfer data between your computer and your EC2 Instance.
Launch the Instance
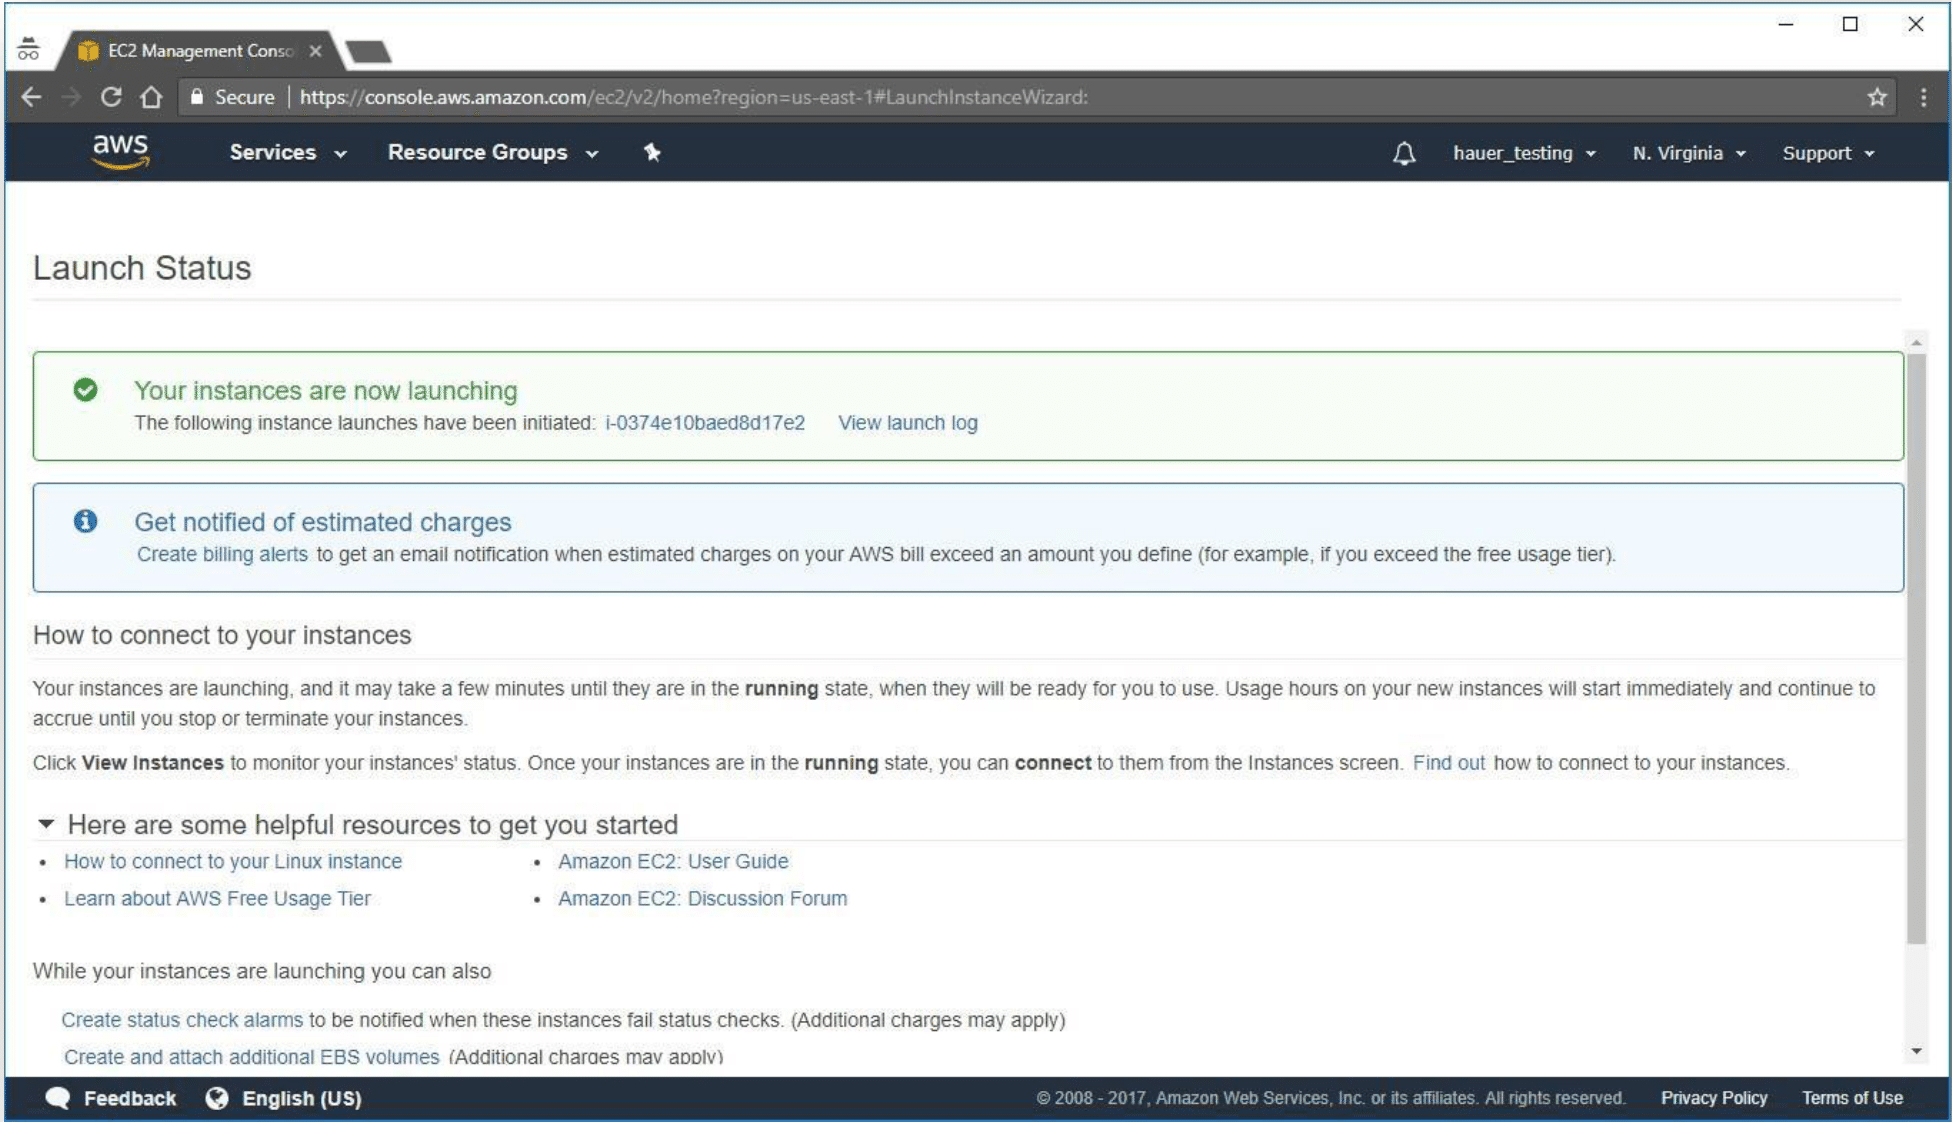
- After creating the key pair, click on the Launch Instances button.
- The Launch Status window provides information on your new EC2 Instance. To view your instance, scroll to the bottom of the page and click on the View Instances button.

Terminate the Instance
Important: Do not terminate your EC2 Instance until you have finished processing and moved any files you want to save from your instance to your computer. To connect to your EC2 Instance and move files in or out, refer to the ASF Data Recipes: How to Connect to an AWS EC2 Instance — OS X and How to Connect to an AWS EC2 Instance using PuTTY v1.1 (Windows)
- Once you have launched your instance, you will start incurring charges on your account.
- When you have finished processing, you need to terminate the EC2 instance to avoid incurring additional charges.
- From the EC2 Dashboard, navigate to Actions > Instance State.
- Click on Terminate and confirm.
- This deletes the instance and all data stored on the instance; a new AMI will need to be configured for any future processing.
- From the EC2 Dashboard, navigate to Actions > Instance State.
Important: Selecting Stop will shut the instance down and stop further EC2 charges from accruing. But you will continue to be charged for the data left in the instance EBS storage volume (e.g., the GMT5SAR script, granule files, PRODUCT files, etc.) The advantage of this option is that you can restart the instance and avoid configuring a new one for additional processing.
Note: Each time an instance is started, a minimum one minute is charged. After one minute, you are charged by the seconds used.
